Difference between revisions of "ICT student textbook/Print version"
(Created page with "__NOTOC__ {{Print version notice|ICT_student_textbook}} <div style="margin: 1em 0 -1em;"> 300px|center </div> {{print version cover|ICT_student_textbook}}...") |
m (1 revision imported) |
||
| (2 intermediate revisions by 2 users not shown) | |||
| Line 4: | Line 4: | ||
[[Image:Book.jpg|300px|center]] | [[Image:Book.jpg|300px|center]] | ||
</div> | </div> | ||
| − | {{print version cover| | + | {{print version cover|ICT student textbook}} |
<br style="page-break-after: always"> | <br style="page-break-after: always"> | ||
| Line 18: | Line 18: | ||
{{:ICT_student_textbook/What_is_the_nature_of_ICT}} | {{:ICT_student_textbook/What_is_the_nature_of_ICT}} | ||
| − | {{Print chapter heading| | + | {{Print chapter heading|Data representation and processing}} |
| − | {{:ICT_student_textbook/ | + | {{:ICT_student_textbook/Data_representation_and_processing}} |
| + | |||
| + | {{Print chapter heading|Communication with graphics}} | ||
| + | {{:ICT_student_textbook/Communication_with_graphics}} | ||
| + | |||
| + | {{Print chapter heading|Audio visual communication}} | ||
| + | {{:ICT_student_textbook/Audio_visual_communication}} | ||
| + | |||
| + | {{Print chapter heading|Educational applications for learning your subjects}} | ||
| + | {{:ICT_student_textbook/Educational_applications_for_learning_your_subjects}} | ||
{{Print chapter heading|What is the nature of ICT level 1}} | {{Print chapter heading|What is the nature of ICT level 1}} | ||
| Line 30: | Line 39: | ||
{{:ICT_student_textbook/What_all_can_a_computer_do}} | {{:ICT_student_textbook/What_all_can_a_computer_do}} | ||
| − | {{Print chapter heading| | + | {{Print chapter heading|/level_1_learning_check_list}} |
| − | {{:ICT_student_textbook/ | + | {{:ICT_student_textbook/What_is_the_nature_of_ICT_level_1_learning_check_list}} |
| + | |||
| + | {{Print chapter heading|Data representation and processing level 1}} | ||
| + | {{:ICT_student_textbook/Data_representation_and_processing_level_1}} | ||
| + | |||
| + | {{Print chapter heading|Data can tell stories}} | ||
| + | {{:ICT_student_textbook/Data_can_tell_stories}} | ||
| + | |||
| + | {{Print chapter heading|How to make data meaningful}} | ||
| + | {{:ICT_student_textbook/How_to_make_data_meaningful}} | ||
| − | {{Print chapter heading|What is the nature of ICT level 2}} | + | {{Print chapter heading|A concept map of my data}} |
| + | {{:ICT_student_textbook/A_concept_map_of_data}} | ||
| + | |||
| + | {{Print chapter heading|Making a text document}} | ||
| + | {{:ICT_student_textbook/Making_a_text_document}} | ||
| + | |||
| + | {{Print chapter heading|/level 1_learning_check_list}} | ||
| + | {{:ICT_student_textbook/Data_representation_and_processing_level_1_learning_check_list}} | ||
| + | |||
| + | {{Print chapter heading|Communication with graphics level 1}} | ||
| + | {{:ICT_student_textbook/Communication_with_graphics_level_1}} | ||
| + | |||
| + | {{Print chapter heading|Photo and image essays}} | ||
| + | {{:ICT_student_textbook/Photo_and_image_essays}} | ||
| + | |||
| + | {{Print chapter heading|Tell a story}} | ||
| + | {{:ICT_student_textbook/Tell_a_story}} | ||
| + | |||
| + | {{Print chapter heading|/level 1_learning_check_list}} | ||
| + | {{:ICT_student_textbook/Communication_with_graphics_level_1_learning_check_list}} | ||
| + | |||
| + | {{Print chapter heading|Educational_applications_for_learning_your_subjects_level_1}}{{:ICT_student_textbook/Educational_applications_for_learning_your_subjects_level_1_learning_check_list}} | ||
| + | |||
| + | {{Print chapter heading|Building vocabulary with Kanagram}} | ||
| + | {{:ICT_student_textbook/Help_build_your_vocabulary_with_Kanagram}} | ||
| + | |||
| + | {{Print chapter heading|Learning maths with Geogebra 1}} | ||
| + | {{:ICT_student_textbook/Explore_maths_with_Geogebra_level_1}} | ||
| + | |||
| + | {{Print chapter heading|Drawing_with_Geogebra}} | ||
| + | {{:ICT_student_textbook/Drawing_with_Geogebra}} | ||
| + | |||
| + | {{Print chapter heading|Getting_introduced_to_lines_and_angles}} | ||
| + | {{:ICT_student_textbook/Getting_introduced_to_lines_and_angles}} | ||
| + | |||
| + | {{Print chapter heading|Level 1 learning check list}}{{:ICT_student_textbook/Educational_applications_for_learning_your_subjects_level_1_learning_check_list}} | ||
| + | |||
| + | |||
| + | {{Print chapter heading|What is the nature of ICT level 2}} | ||
{{:ICT_student_textbook/What_is_the_nature_of_ICT_level_2}} | {{:ICT_student_textbook/What_is_the_nature_of_ICT_level_2}} | ||
| Line 42: | Line 98: | ||
{{:ICT_student_textbook/The_human_story_behind_the_computer}} | {{:ICT_student_textbook/The_human_story_behind_the_computer}} | ||
| − | {{Print chapter heading| | + | {{Print chapter heading|Level 2 learning check list}} |
| − | {{:ICT_student_textbook/ | + | {{:ICT_student_textbook/What_is_the_nature_of_ICT_level_2_learning_check_list}} |
| + | |||
| + | {{Print chapter heading|Data representation and processing level 2}} | ||
| + | {{:ICT_student_textbook/Data_representation_and_processing_level_2}} | ||
| + | |||
| + | {{Print chapter heading|Columns and rows!}} | ||
| + | {{:ICT_student_textbook/Columns_and_rows!}} | ||
| + | |||
| + | {{Print chapter heading|Numbers and patterns}} | ||
| + | {{:ICT_student_textbook/Numbers_and_patterns}} | ||
| − | {{Print chapter heading| | + | {{Print chapter heading|Level 2 learning check list}} |
| − | {{:ICT_student_textbook/ | + | {{:ICT_student_textbook/Data_representation_and_processing_level_2_learning_check_list}} |
| − | {{Print chapter heading| | + | {{Print chapter heading|Communication with graphics level 2}} |
| − | {{:ICT_student_textbook/ | + | {{:ICT_student_textbook/Communication_with_graphics_level_2}} |
| − | {{Print chapter heading| | + | {{Print chapter heading|Stories and songs come alive with pictures}} |
| − | {{:ICT_student_textbook/ | + | {{:ICT_student_textbook/Stories_and_songs_come_alive_with_pictures}} |
| − | {{Print chapter heading| | + | {{Print chapter heading|Creating animations}} |
| − | {{:ICT_student_textbook/ | + | {{:ICT_student_textbook/Creating_animations}} |
| − | {{Print chapter heading| | + | {{Print chapter heading|Level 2 learning check list}} |
| − | {{:ICT_student_textbook/ | + | {{:ICT_student_textbook/Communication_with_graphics_level_2_learning_check_list}} |
| − | {{Print chapter heading| | + | {{Print chapter heading|Audio visual communication level 2}} |
| − | {{:ICT_student_textbook/ | + | {{:ICT_student_textbook/Audio visual communication level 2}} |
| − | {{Print chapter heading| | + | {{Print chapter heading|Audio story telling}} |
| − | {{:ICT_student_textbook/ | + | {{:ICT_student_textbook/Audio story telling}} |
| − | {{Print chapter heading| | + | {{Print chapter heading|Words and sounds to tell a story}} |
| − | {{:ICT_student_textbook/ | + | {{:ICT_student_textbook/Combining sounds and words to tell a story}} |
| − | {{Print chapter heading| | + | {{Print chapter heading|Audio visual communication level 2 learning check list}} |
| − | {{:ICT_student_textbook/ | + | {{:ICT_student_textbook/Audio visual communication level 2 learning check list}} |
| − | {{Print chapter heading| | + | {{Print chapter heading|Educational applications for learning your subjects level 2}} |
| − | {{:ICT_student_textbook/ | + | {{:ICT_student_textbook/Educational applications for learning your subjects level 2}} |
| − | {{Print chapter heading| | + | {{Print chapter heading|Your desktop atlas with KGeography}} |
| − | {{:ICT_student_textbook/ | + | {{:ICT_student_textbook/Your desktop atlas with KGeography}} |
| − | {{Print chapter heading| | + | {{Print chapter heading|Learning maths with Geogebra 2}} |
| − | {{:ICT_student_textbook/ | + | {{:ICT_student_textbook/Explore maths with Geogebra level 2}} |
| − | {{Print chapter heading| | + | {{Print chapter heading|Learning about triangle properties}} |
| − | {{:ICT_student_textbook/ | + | {{:ICT_student_textbook/Getting introduced to triangle properties}} |
| − | {{Print chapter heading| | + | {{Print chapter heading|Learning symmetry}} |
| − | {{:ICT_student_textbook/ | + | {{:ICT_student_textbook/Exploring symmetry with Geogebra}} |
| − | {{Print chapter heading| | + | {{Print chapter heading|Level 2 learning check list}} |
| − | {{:ICT_student_textbook/ | + | {{:ICT_student_textbook/Educational applications for learning your subjects level 2 learning check list}} |
| − | |||
| − | |||
| − | {{Print chapter heading| | + | {{Print chapter heading|What is the nature of ICT level 3}} |
| − | {{:ICT_student_textbook/ | + | {{:ICT_student_textbook/What is the nature of ICT level 3}} |
| − | {{Print chapter heading| | + | {{Print chapter heading|The machine is using us}} |
| − | {{:ICT_student_textbook/ | + | {{:ICT_student_textbook/The machine is using us}} |
| − | {{Print chapter heading| | + | {{Print chapter heading|The global digital library}} |
| − | {{:ICT_student_textbook/ | + | {{:ICT_student_textbook/The global digital library}} |
| − | {{Print chapter heading| | + | {{Print chapter heading|I have a new address}} |
| − | {{:ICT_student_textbook/ | + | {{:ICT_student_textbook/I have a new address}} |
| − | {{Print chapter heading| | + | {{Print chapter heading|Level 3 learning check list}} |
| − | {{:ICT_student_textbook/ | + | {{:ICT_student_textbook/What is the nature of ICT level 3 learning check list}} |
| − | {{Print chapter heading| | + | {{Print chapter heading|Data representation and processing level 3}} |
| − | {{:ICT_student_textbook/ | + | {{:ICT_student_textbook/Data representation and processing level 3}} |
| − | {{Print chapter heading| | + | {{Print chapter heading|Spreadsheet for data analysis}} |
| − | {{:ICT_student_textbook/ | + | {{:ICT_student_textbook/Spreadsheet for data analysis}} |
| − | {{Print chapter heading| | + | {{Print chapter heading|Multi page text document}} |
| − | {{:ICT_student_textbook/ | + | {{:ICT_student_textbook/Multi page text document}} |
| − | {{Print chapter heading| | + | {{Print chapter heading|Level 3 learning check list}} |
| − | {{:ICT_student_textbook/ | + | {{:ICT_student_textbook/Data representation and processing level 3 learning check list}} |
{{Print chapter heading|Communication with graphics level 3}} | {{Print chapter heading|Communication with graphics level 3}} | ||
| − | {{:ICT_student_textbook/ | + | {{:ICT_student_textbook/Communication with graphics level 3}} |
{{Print chapter heading|Making comic strips}} | {{Print chapter heading|Making comic strips}} | ||
| − | {{:ICT_student_textbook/ | + | {{:ICT_student_textbook/Making comic strips}} |
{{Print chapter heading|Making posters}} | {{Print chapter heading|Making posters}} | ||
| − | {{:ICT_student_textbook/ | + | {{:ICT_student_textbook/Making posters}} |
| + | |||
| + | {{Print chapter heading|Level 3 learning check list}} | ||
| + | {{:ICT_student_textbook/Communication with graphics level 3 learning check list}} | ||
| + | |||
| + | {{Print chapter heading|Audio visual communication level 3}} | ||
| + | {{:ICT_student_textbook/Audio visual communication level 3}} | ||
| − | {{Print chapter heading| | + | {{Print chapter heading|Make an audio book}} |
| − | {{:ICT_student_textbook/ | + | {{:ICT_student_textbook/Make an audio book}} |
| + | |||
| + | {{Print chapter heading|Make a read aloud audio visual book}} | ||
| + | {{:ICT_student_textbook/Make a read aloud audio visual book}} | ||
| + | |||
| + | {{Print chapter heading|Level 3 learning check list}} | ||
| + | {{:ICT_student_textbook/Audio visual communication level 3 learning check list}} | ||
| − | {{Print chapter heading| | + | {{Print chapter heading|Educational applications for learning your subjects level 3}} |
| − | {{:ICT_student_textbook/ | + | {{:ICT_student_textbook/Educational applications for learning your subjects level 3}} |
| − | {{Print chapter heading| | + | {{Print chapter heading|The globe on your table with Marble}} |
| − | {{:ICT_student_textbook/ | + | {{:ICT_student_textbook/The globe on your table with Marble}} |
| − | {{Print chapter heading| | + | {{Print chapter heading|Playing with the globe}} |
| − | {{:ICT_student_textbook/ | + | {{:ICT_student_textbook/Playing with the globe}} |
| − | {{Print chapter heading| | + | {{Print chapter heading|Precipitation, weather and climate}} |
| − | {{:ICT_student_textbook/ | + | {{:ICT_student_textbook/Precipitation, weather and climate}} |
| − | {{Print chapter heading| | + | {{Print chapter heading|Local weather and climate patterns}} |
| − | {{:ICT_student_textbook/ | + | {{:ICT_student_textbook/Local weather and climate patterns}} |
| − | {{Print chapter heading| | + | {{Print chapter heading|Explore maths with Geogebra 3}} |
| − | {{:ICT_student_textbook/ | + | {{:ICT_student_textbook/Explore maths with Geogebra 3}} |
| − | {{Print chapter heading| | + | {{Print chapter heading|Learning about quadrilateral properties}} |
| − | {{:ICT_student_textbook/ | + | {{:ICT_student_textbook/Getting introduced to quadrilateral properties}} |
| − | {{Print chapter heading| | + | {{Print chapter heading|How to make Geogebra dynamic?}} |
| − | {{:ICT_student_textbook/ | + | {{:ICT_student_textbook/Using a slider to build animation}} |
| − | {{Print chapter heading| | + | {{Print chapter heading|Learning science with different technology tools}} |
| − | {{:ICT_student_textbook/ | + | {{:ICT_student_textbook/Learning science with different technology tools}} |
| − | {{Print chapter heading| | + | {{Print chapter heading|Level 3 learning check list}} |
| − | {{:ICT_student_textbook/ | + | {{:ICT_student_textbook/Educational applications for learning your subjects level 3 learning check list}} |
| − | {{Print chapter heading| | + | {{Print chapter heading|Concluding remarks}} |
| − | {{:ICT_student_textbook/ | + | {{:ICT_student_textbook/Concluding remarks}} |
| − | {{Print chapter heading| | + | {{Print chapter heading|Additional readings}} |
| − | {{:ICT_student_textbook/ | + | {{:ICT_student_textbook/Additional readings}} |
| − | {{Print chapter heading| | + | {{Print chapter heading|Science, Technology and Society}} |
| − | {{:ICT_student_textbook/ | + | {{:ICT_student_textbook/Science, Technology and Society}} |
| − | {{Print chapter heading| | + | {{Print chapter heading|Ethics of technology}} |
| − | {{:ICT_student_textbook/ | + | {{:ICT_student_textbook/What students need to know about ethics of technology}} |
Latest revision as of 18:15, 17 May 2017
| This is the print version of ICT_student_textbook You won't see this message or any elements not part of the book's content when you print or preview this page. |

The current, editable version of this book is available at
https://oer.teacher-network.in/index.php/ICT_student_textbook

Overview
- Introduction
- What is the nature of ICT
- Data representation and processing
- Communication with graphics
- Audio visual communication
- Educational applications for learning your subjects
Level 1
- What is the nature of ICT level 1
- Data representation and processing level 1
- Communication with graphics level 1
- Educational applications for learning your subjects level 1
Level 2
- What is the nature of ICT level 2
- Data representation and processing level 2
- Communication with graphics level 2
- Audio visual communication level 2
- Educational applications for learning your subjects level 2
Level 3
- What is the nature of ICT level 3
- Data representation and processing level 3
- Communication with graphics level 3
- Audio visual communication level 3
- Educational applications for learning your subjects level 3
- Concluding remarks
- Additional readings
- Questions & Answers
Have a question? Why not ask the very textbook that you are learning from?
Further Reading
- National Curriculum Framework
- Kerala ICT textbook
Preface
Through the course of history, there have been discoveries and inventions that have changed social processes and structures greatly. The agricultural revolution and industrial revolution created the agrarian and industrial societies respectively. We are now in another such age, brought on by Information Communication Technologies (ICT). With information creation, access, processing and sharing becoming quicker and simpler, society is now being shaped by these processes, so much so that, the term Information Society is used to describe society today. Participating in this society requires the development of new skills as well as an understanding of how these processes are affecting society. It is the responsibility of the education system to respond to this by helping students develop an understanding of ICT, its impact on society and the possibilities for learning through ICT. The education system also has to support the building of skills in students that will make them capable of functioning in, and be responsive to, a society shaped by ICT.
In this context, the Telangana Department of School Education is seeking to implement an ICT program in the state through an integrated approach that includes teacher capacity building, development of a syllabus for ICT learning, development of content to support learning and provisioning of adequate infrastructure. Accordingly, the Telangana Department of School Education has developed an ICT text book and teacher hand book which will be used by the school teachers transacting the ICT classes from Class 6-10. These books are developed in line with the National ICT curriculum developed by National Council of Educational Research and Training (NCERT), which seeks to bring to school education the possibilities of ICT for connecting and learning, and creating and learning, in collaboration with IT for Change, and with support from CEMCA.
Approach and intent of the state ICT syllabus
The state ICT syllabus has been based on the aspirations and guidelines set in the National ICT Policy which focuses on building the skills of computing, creating and collaborating through safe, ethical and legal means of using ICT.
The syllabus has emphasized the different possibilities of ICT in society, briefly discussed below.
- Connecting with the world: Technology is providing new ways for us to access information and learn. Evaluating information and using it appropriately are skills to be developed. This theme will focus on accessing the internet, evaluating resources available and creating personal digital libraries for self learning.
- Connecting with each other: A related dimension of connecting through ICT is in the possibility for learning in communities from one another. The focus of this theme will be on how to interact and learn in peer learning settings and through on-line, virtual forums. Collaborating and learning together is a key learning expectation from this curriculum.
- Interacting with ICT: Building skills and aptitudes in a technology environment is an important expectation of this curriculum. The theme will focus on building a more pro-active approach to engaging with technology, evaluating appropriate technology choices and maintaining ICT infrastructure. It is also important to be a critical user of technology, by becoming aware of the different positive and negative social and economic implications of technology.
- Creating with ICT: This is a theme that focuses on building computing and creating skills in students and teachers using various ICT applications. These include data analysis and processing, creating graphics, creating audio visual communications, working with mapping applications, creating resources with specific school subject related applications and programming.
Ability to work in the ICT environment, creating content, sharing and learning and focusing on educational and learning processes, are the key principles of this syllabus design, rather than on just learning specific applications. The syllabus has been designed keeping in mind the various possibilities of creative expression possible through ICT applications and platforms available today and also seeks to build a mindset that will explore such applications proactively and independently on an ongoing basis. Without taking a conventional approach to building digital literacy on specific applications the syllabus emphasizes a thematic, project based approach to ICT learning. Such an approach will also enable integration of ICT with multiple school subjects.
To facilitate such an approach to ICT learning, the technology environment in schools must be free and open. The syllabus has prescribed the use of free and open source technologies, wherever available, to facilitate such a free and open access. The educational content used in the schools will also be licensed as open content allowing teachers and students to modify and adapt the content to reflect their own contexts. All images used in this book, unless otherwise specified are licensed under Creative Commons or available in the public domain. Most of them are sourced from Wikimedia commons.
How is the textbook structured
We have anticipated the attainment of the competencies and objectives outlined in the National ICT curriculum and ICT Policy in two stages, covering classes 6-8 and classes 9-10 and have developed a syllabus for 5 years, taking into account the student curriculum set out in the National ICT curriculum. This will be covered through two books:
- Book 1 - which will have three levels to cater to the classes 6-8
- Book 2 - which will have two levels to cater to the classes 9-10
The following sets of materials have been prepared to support this syllabus:
- A text book for students, that introduces ICT skills and applications using a project based learning approach, integrated with the different school subjects. The core competencies and skills to be covered in the text book will be determined based on the National ICT curriculum and the Telangana state academic standards and subject text books. The text book will take a project based approach to the attainment of these learning competencies.
- A handbook for teachers and teacher educators to help them implement the syllabus as well as support their own knowledge and learning of the ICT applications based on the NCERT ICT curriculum. This handbook will facilitate the transaction of the ICT syllabus and also provide meaningful linkages to curricular and co-curricular areas. The teacher handbook will also have a component for teachers to build their own competencies in using ICT.
In addition to these two, there is a user manual, providing the features and processes of using the software applications used in the text book. This will be available in a digital format; limited printed copies will be available for schools to access.
Focusing on open content creation, teacher capacity building as well as integrating technology to develop new methods of learning, we hope, can demonstrate an effective model of technology integration in the school system across the country. We also believe such an approach will strengthen the government school system such that the vision of education of ‘equitable quality’ set out by the Indian Right to Education Act is realised.
Introduction
What is ICT

Have you seen something like this? Can you tell what the girls are doing?
They are using a mobile phone to take a photo of themselves. Is there anything different about how they are doing this? Have you ever seen anyone in your school or community or home use a phone? Can you describe the things you have seen them do with a phone?

Look at this machine here - have you have seen something like this anywhere in your neighbourhood? Have you seen anyone use this machine? This is an ATM (Automated Teller Machine), a machine from which you can get cash. Another full form for ATM is 'Any time money'. Usually the name of a bank will be mentioned on the ATM, example State Bank of Hyderabad ATM.
Are you thinking what is common between these two pictures? Let us find out.
Think and write
Look at the table below and complete it. In the last column make a list of equipment and facilities you think you will need for doing these things.
|
Look at the list below and underline if you have done or seen or heard of these things
|

Compare the list you have made with your friends. What did you find? Now you may also be wondering how these things are done.
There is one common feature, which makes all these different things possible - the use of Information Communication Technologies, in short - ICT. ICT refer to those set of technologies that help us create information, access information, analyze information and communicate with one another.
| Is speech ICT? Is writing ICT? Is a book ICT? Is there anything special about ICT now?
|

Human beings have always gathered information and communicated, but what makes these present technologies special is their digital nature. In this textbook, we mean digital technologies or digital ICT when we refer to ICT.
Before we understand more about ICT, look at the list below and circle all the words that you have heard of:
Have_you_heard_of_ICT_terms.mm
File:Have you heard of ICT terms.mm
(If you are referring to the printed book, please open the file "Have_you_heard_of_ICT_terms.mm" on your computer using Freeplane).
As students, you may have been introduced to some of these terms in your school, in your family or in your neighbourhood. The cell phone tower, your nearest ATM, your mother's mobile phone, games, Whatsapp chats, email, the selfie, internet, videos and songs on your computer - all these are examples of a new kind of ICT. These technologies are called digital technologies and they are changing the way we talk to each other, work with each other, and the way we do things. The computer is becoming like a television, the phone is becoming like a computer, you can use the computer to make voice calls, you can record a video with your phone, you can read your newspaper on the phone, and you can even paint with your computer! The technologies that make these possible are called digital technologies, which is a new kind of ICT.
You can read more about how ICT developed, in the chapter on Science, Technology and Society.
We live in an information society
Look at the pictures below and discuss with your friends and teacher.
| What is the bonobo doing in this picture - can you guess? You are correct! It is "fishing" for termites from an ant hill. (Bonobo belongs to the same family as the chimpanzee and used to be called the pygmy chimpanzee).
| |
| What is special about this car? Did you guess? What is the meaning of self-driving car? Yes, it has no driver.
|

To understand more about digital technologies are affecting how we learn and how we work, let us think of a small activity.
Think and write
Let us say you are withdrawing money from a nearby ATM. Can you make a list of all the things you need to do for that? You need your account number, your Personal Identification Number (PIN) and you need to enter the amount of money. When you put your card in the machine, it verifies your PIN, collects information about your bank account, the bank and the balance amount. The ATM machine does all of this, communicates with your bank and allows you to withdraw the money.
In the box below, can you list down three important words that come to your mind when you read about this? Can you draw a flowchart of how you think this activity could happen?
|
|
So many things we do now are based on collecting information, processing information, representing information and communicating information. Many devices - mobile phones, television, computers, tablets, cameras, scanners - collectively called ICT, have made this possible. How we collect information, how we analyze it, how we communicate the information and how we use the information to decide what to do are all very important. ICT and broadly digital technologies are changing the way we do things, thus making today's society an information society . You may be familiar with the computer but now ICT have moved far beyond only the computer. As students you have to learn ICT to build your skills for functioning in the information society.
What can you expect to learn
ICT can help you create music, write poetry, learn mathematics or make videos. ICT can also help you in communicating with each other and learning together. This textbook has been developed to introduce you to all these activities.
In this new subject called ICT, we can expect to learn about ICT and how to work with ICT; this will be covered over 3 academic years.
Knowledge
This subject will introduce you to:
- What is ICT
- How did ICT develop
- Effect of ICT on family, neighbourhood, school and village/city
- Use of ICT ethically, safely and responsibly
Skill
In this subject, through different hands-on activities and projects you will learn to:
- Use ICT to express your ideas, using available resources (using images, audio, text, videos)
- Use ICT to learn school subjects and improve your general knowledge
- Use ICT to talk to your friends, to work together and to play together
- Use ICT in cultural activities and in the development of the local community.
As students, you are encouraged to explore this new area and make connections to your own daily life, the impact these ICT have on your life, how you would like to work with this technology and how you can equip yourself to understand this new way of thinking, learning and communicating.
How is this book organized
The textbook has 5 units, for five themes of ICT learning:
- What is the nature of ICT
- Data representation and processing
- Communication with graphics
- Audio visual communication
- Learn your school subjects
- There is an overview section which has an overall introduction for each of the units. This overview for each unit is for you to get a complete view of what are the various aspects you will learn in that unit. These aspects will be then covered level-wise. Some of these ideas may be unfamiliar in the beginning, you could revise them after you finish the level-wise activities.
- Each unit has a brief introduction followed by hands-on (meaning practical work with your computer) activities for each unit / theme. These units will have activities at three different levels, as you move from class 6-8. Different ICT devices (hardware) and applications (software) will be used for the activities. Your teacher will show you how to use these ICT devices and applications. Instructions for learning applications are available here. You can visit these pages to learn about these applications, which you will use for some of the activities in this book.
- Your teacher will determine the appropriate level of activity. She will introduce a new unit or an activity with a demonstration. This will be followed by activities for you. These activities could include some projects and will involve individual or group work.
- You can work individually or in groups or read the textbook and discuss in the classroom. Different groups in the class will work on different examples for a given theme and share your analysis, findings and creations. You will learn together and also teach one another!
What is the nature of ICT
What is this unit about
In the previous chapter, we saw how ICT are part of many things we do; and how they have changed the way we are working, learning and even playing. What is it about ICT that allows such changes to happen?
Let us consider the following pictures. Below each picture write 2-3 words describing what is happening in the picture.

Teachers in a video conference
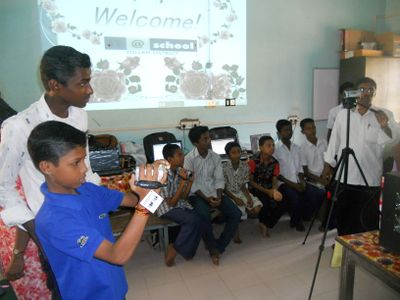
Students learning how to shoot with a camera

Learning to read with a tablet


|
Look at each of the pictures above and write 3 words that come to your mind in each picture |
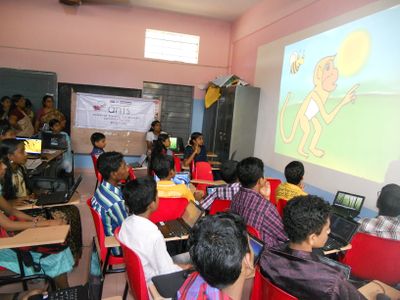
Students learning animation

Students learning with a simulation

Woman with a Cellphone


|
Look at each of the pictures above and write 3 words that come to your mind in each picture |
Image credits: Kerala IT@Schools project, Government high school, Mysuru, IT for Change, Wikimedia Commons. All images are licensed under Creative Commons license which allows for free sharing with attribution.
Think and write
Write down below what are the characteristics of ICT that allows the various things above. Discuss these with your friends and teacher.
|
|
To do these things, you use many ICT devices such as a mobile phone, a computer, camera. People may tell you about how they communicated or did things in the days before the phone. It may be very hard for you to imagine but ICT (and all other technologies) were not always there - they were developed over time.
| Ask your teacher or parent or other older members in your neighbourhood when was the first time they saw a computer or a phone or a TV.
|
In this unit, you will learn about what are ICT, how ICT developed and how we need to work with ICT for all of us to benefit. You can read more about how ICT developed in the chapter on Science, Technology and Society.
You may also have guessed one more thing - the different devices need to be connected. Internet, which you may have heard of, is a network of computers connected with one another. Later in this unit, we will see how these these help in doing the various things above.
Objectives
Interacting with ICT
- Understanding the nature of ICT - how technology has developed in society, how ICT have developed and how ICT have changed the society
- Understanding about the ICT environment - various devices and applications
- Understanding the safe use of ICT, including the internet
- Understanding the ethical and legal aspects of ICT
Communicating with ICT
- Understanding how to use technology for self learning
- Understanding how to use technology for connecting with each other for learning
Creating with ICT
- Understanding that you can do various things with ICT (like writing, painting, mapping, singing)
- Getting familiar with different applications for creating with ICT
ICT have changed the society
Look around you - can you make a list of things that have digital technologies involved in them? Yes, that is right. Starting from the computer in your school, television, movies, videos and other materials for subject learning, mobile communication, Aadhar card, land records, bank accounts, pension accounts and so many more things, ICT have become integrated into society in many ways.
1. ICT can help create: ICT can create information in so many different ways - maps, audio, video, text, numeric data. You no longer need to share your ideas only in text. This means newer and newer methods of creation and sharing. You can also learn in different ways. How you can learn learn and what is needed to be learnt have become different. For example, we no longer need to learn about a cash withdrawal slip, we need to know how to use the ATM. Your teacher can now take a video of a class in your school and share it. Different devices are getting developed; more and more functions are being performed by less number of devices. For example, you can use the computer to watch a movie or play music. A smart phone can do many things a computer can do.
2. ICT can help connect and communicate: The most important thing about ICT today is the internet. The internet has changed the way we think of communicating with one another. Talking to a friend through WhatsApp or Telegram chats, emailing or making a video call are just some of the ways in which the internet has changed the way we talk with others. With the internet, you can also connect to any computer in the world and get information. You can join other friends, form groups to learn about many things.

|

|
Before digital ICT came, a potter could be gathering data about the mud, the water, the texture and he was making the pot. Now you have a photo of the pottery making and it is possible to know about the pot by looking a picture and reading about it. Is there any difference between what you know and what the potter knows? |
- What are the ways in which ICT can help the potter create knowledge?
- What are the ways in which ICT can help the potter communicate?
If so many things are impacted by ICT, it is important to understand how these work, and how they should be used ethically and safely. ICT should be used in such a way that all can benefit.
For example, take a resource like water or air. Would you not want good quality water to be available to everyone? Don't you want all students to be able to go to schools? Don't you want good hospitals to be available to all? Similarly, technology should be treated like a common resource of society, where everyone can access it, interact with it, benefit from it and contribute to it. More and more people should be able to use ICT according to their needs. ICT should also be treated like a common resource or a public good - like public transport, public education or public health.
What is the internet
(This section contains some theoretical information about the internet; your teacher will discuss this with you. It is also possible to go to the activities directly and come back to this section after the activity).
| You may have, or you may have seen someone, look for some information using a computer or mobile phone. How is this possible? The internet makes this possible. The internet is nothing but a network of computers. Your computer may not have all the information you need. There may be other computers in different organizations, giving us different types of information. These computers are connected to one another, their network is called the Internet. The Internet is a physical network of millions of computers across the world. Each computer has a unique identifier. Some of these computers act as 'servers', they store data which can be accessed by other computers, hence the internet is like a huge library with information on almost any issue. | |
| Initially the internet was a set of computers connected by one another and you had to send text messages for getting the information you need. This was difficult to do. In 1989, Sir Timothy Berners Lee developed an application called the "World Wide Web - www". Yes, the "www" is an application on the internet to access the internet in the form of a web pages, using an application called the Web Browser. Have you heard of the word browsing centre?
The web browser makes getting information from the internet easier. Computers transfer information through a method called Hyper Text Mark-up Language or HTML. Any information that we want to share - text, image or even audio and video - can all be shared by developing these web pages. Different kinds of information could be made available and accessing the information also became easier. | |
| Now can you think of all the places the internet is being used? Write them below.
If you have accessed the internet, or if you know of anyone who has accessed the internet , can you list below 2-3 web sites? Have you had any questions about or while using the internet? |


How is the unit organized
In this unit, there are three levels of activities. Level 1 activities will introduce you to the unit and will be simple. Activities at the second and third level will be more advanced. This will be based on the ICT skills needed as well as the subject you are studying through that activity. At each level, you will learn ICT skills which would help you do a more advanced activity at the next level.
You can imagine this somewhat like a spiral staircase.
At each level you will be exploring new things about ICT; you will also be creating your outputs and building what is called a digital portfolio. This portfolio will include your outputs; from these you will be able to know what you have learnt. At the end of the year, your teacher will assess your portfolio.
You will also keep adding and changing your portfolio. How is that possible? When you make a model of clay or thermocol, you cannot change it after you make it. One of the special features of ICT is that you can change (edit) your creation. This means that, in Class 7 you can change what you completed in class 6 or in Class 8 you can change what you completed in class 7. This means you can keep adding to your knowledge and also improve the quality of your output. You will have a cumulative portfolio at the end of class 8.
Level 1
Level 2
Level 3
Data representation and processing
What is this unit about
If someone asks you what is data, what would your answer be? Read the following sentences and if you agree, put a tick mark. Add other things you do in which you gather data.
|
Gathering data from the environment, analyzing and understanding and decision making are important for survival. Imagine human beings hunting and roaming in the forests - if they see a wolf, they should process the data and quickly run for cover. So, gathering data and using it for decision making is not new for human beings.
Can you guess what may be different about this unit? Yes - you are correct! Digital technologies have changed the way we are gathering data and representing data. Discuss with your friends, in groups, all the word that come to your mind when you say data. Now look at the following and identify whether the following are data or not.


|
|
|

|
| |||
|
|
|

|

|
Are you surprised? All the above are data. We saw how computers work by converting everything into data. Whether we see a picture, or listen to a song or perform calculations, we are working with data. In today's world data is becoming more and more important and we should develop skills of understanding data to make decisions.
Objectives
- Understanding how to read data in various formats and analyze
- Understanding methods of data organizing, analysis and representation
- Processing and representing data in textual, image and numeric formats with different tools
- Understanding the power of data visualization
How is this unit organized
As in the previous unit, there are three levels of activities, for classes 6,7 and 8 respectively. This is the first unit in which you will be interacting with different ICT applications and will be getting introduced to basic digital literacy. In this unit, one of the first things you will learn is to type in the local language.
- At the first level, the focus will be on reading data in different formats, organizing data, analysing and making meaning. You will be introduced to concept mapping and text editing as a method of documenting your analysis.
- At the second level, you will learn to use spreadsheet for data collection, organizing and analysis.
- At the third level, which will be in the third year, you will be introduced to making multi-page documents to communicate your ideas.
At each level you will be exploring new things about ICT; you will also be creating your outputs and building your digital portfolio. This portfolio will include your outputs; they will be such that you will know what you have learnt and you will also know the method of learning. At the end of the year, your teacher will assess your portfolio.
The examples will be drawn from your textbook and will be related to different topics you have studied.
The links to each of the units are provided below.
Level 1
Level 2
Level 3
Communication with graphics

What is this unit about?
A picture tells a thousand stories, they say! Have you ever wondered about how a picture can tell a story? When we hear a story, when we read a story, our mind forms an image of what is being described. They make us connect to the story. Similarly, when we see a picture, our mind tries to build the story from the picture. No wonder that picture story books are favourite reading books for children and adults.
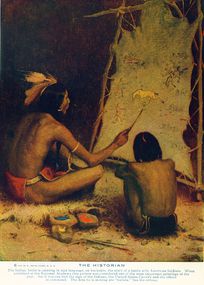
In this unit, we will learn how we can use pictures as a method of story telling. Story telling is a traditional method of transmitting information from one person to another; one generation to another. Story telling can also be used to create awareness about social issues and challenges - talk to your teacher about how Burra Katha emerged as an art form in Telangana. Drawing pictures is also not new. Human beings have been using pictures to tell stories, describe things throughout our history - from cave paintings to Deccani paintings to the comic strip or to the movie poster.
Can you guess what is new about this unit? Yes, it is the use of new, digital methods to create pictures and combining them with text. This field of ICT involving the creation of visual (pictures and text) stories is called graphics and is developing fast as a method of developing communication. In the earlier unit on data processing, you saw how data is represented in multiple formats - through text, numbers, and maps, photos and pictures.
In this unit, we will focus on how we can use digital methods to create such graphic representations. You will be creating with ICT, interacting with various ICT applications and devices and developing messages for communication.
The beginning of photography!
|
|
Your teacher will show you the following video to give you an idea of how photography began. Watch the times shown, how people lived and worked. In your home or local neighbourhood, find out if there are any old photographs. |
Telling stories with pictures - 1

Picture for discussion - 1
Picture for discussion - 2
Picture for discussion - 3
Picture for discussion -4
_(14568810978).jpg)


What ideas come into your mind when you see the pictures? Discuss with your friends what ideas came into their mind. You may have come to the understanding that pictures can tell stories in many ways:
- Show how we feel
- Describe events
- They can sometimes express ideas beyond words
- A picture can be a substitute for an experience - you can understand the event even if you have not seen or heard it directly
- Combined with words
Telling stories with pictures - 2
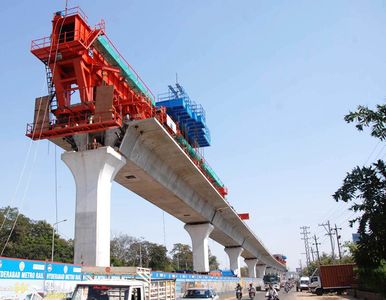
Metro Rail Progress Picture 1

Metro Rail Progress Picture 2
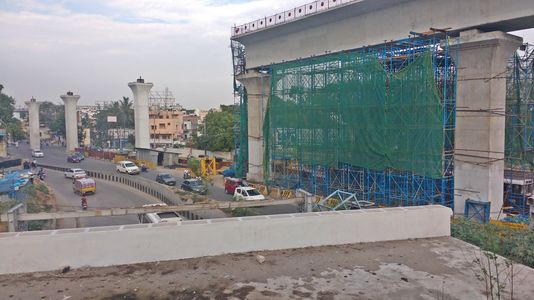
Metro Rail Progress 3


Metro Rail Progress Picture 4
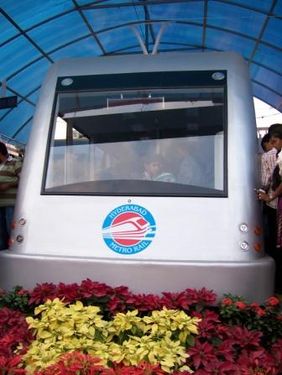
Metro Rail Progress Picture 5
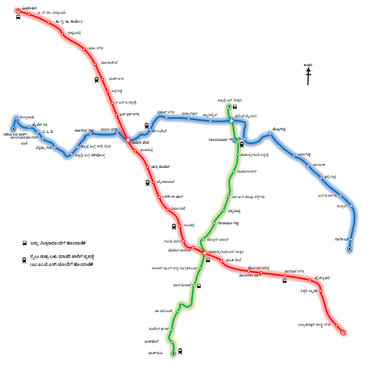
Metro Rail Progress Picture 6


Look at these pictures and discuss with your friends:
- What do these pictures represent?
- Are they in any order? Should the order be changed? Will that help you talk about the metro better?
- If someone were to ask you to tell about Hyderabad Metro Rail in photos, would you use these pictures or would you want to take some more pictures? What would you have to do before you start collecting the pictures?
Objectives
- Understanding the power of story telling as a method of communication and that pictures can tell stories
- Understanding how to tell a story - developing a story board and determining how/ when to introduce different elements – text, images, designs
- Creating digital art
- Accessing images and pictures from the internet
- Creating a graphic communication - combining images and text
How is the unit organized
In this unit, similar to the previous units, you will work on activities at three levels. Broadly the levels are divided in terms of the following skills:
- At level one, you will focus on compiling pictures and reading them to tell a story
- At the second level, you will create pictures with digital tools and learn to illustrate stories and songs
- At the third level, you will develop a story sequence, look for suitable images, or create suitable images, and combine with text to create your own posters, comic strips and story books
- The examples for graphics creation will be drawn from your textbook and will be related to different topics you have studied. You would have learnt to type in Telugu and make a concept map in the activities in the data representation and processing unit. You would have also learnt to make simple documents with a text processor. All these skills you will learn in the unit on data representation and processing will help you develop your graphic communication.
- You will continue to add to your portfolio. You should look at your portfolio as a library for learning various subjects. This theme also will be covered across classes 6,7 and 8 through the following three levels, respectively.
Communication with graphics level 1
Communication with graphics level 2
Communication with graphics level 3
Audio visual communication
What is this unit about
One of the most exciting things about ICT is videos - and this unit is about that. While human beings have been writing text and drawing pictures, videos are a relatively recent development. See below for the first video that was developed!
Can you make out how this was developed? Discuss with your friends and teachers.
See the following video - can you identify the elements in the video?
Yes, the video has the following elements:
- Picture
- Sound
- Movement
(A video is a series of images, communication movement, accompanied by audio).
We have already seen that all of this is data. ICT have made it possible to create data in the form of pictures, numbers, text, voice, sound and combine this to form a video. By itself, a picture can tell a story, text can tell a story, a voice can tell a story. Combining these is also a story telling exercise and is called audio visual communication. In this unit, we will look at how to create an audio visual communication. You will be introduced to this unit from class 7.
Objectives
- Audio is a form of communication
- Audio can be verbal (use of words) and non verbal
- Audio can be combined with images
- Video can be a combination of images and audio
- Audio visual communication can be combined with text
- Ability to narrate a story, developing a story board
How is this unit organized
Like in the previous units, you will be working on this in multiple levels. Audio visual will be covered in classes 7 and 8 through the following two levels (this theme will not be transacted in class 6).
Audio visual communication level 1
Audio visual communication level 2
Audio visual communication level 3
Educational applications for learning your subjects

What is this unit about
You will be exploring in each of the units how ICT can be used to create text, images or audio. You may be have a question - whether ICT help me in my subject learning? Can a graphic creation help learn social science or help me with Telugu language or can an animation help me with doing a science experiment? You are correct! These characteristics of ICT that allow us to create different outputs let us create many applications for learning your school subjects. For example, your teacher may decide to use image essays in your Telugu classes for helping you with your language learning through story telling. There are also applications that help you draw and learn geometry. There are maps that you can use and study on the computer. These applications can help you build the skills needed for learning a subject, or help you understand the concept better by adding audio visual or graphic content. Some of your classes will even become very different when the teacher starts using these resources. As you work with these different tools, you will learn an important aspect of these applications, as compared with your textbook. Can you guess what it might be? You will find out soon as you work with different educational applications with your teacher.
Objectives
In this unit, you will be introduced to the following:
- Understanding of the different features of a tool for a given subject
- Being able to use different / similar applications for multiple subjects
- Using the features of the tool to make your own creations that are relevant to your subjects
- Learning your subject better by exploring concepts in different ways
How is this unit organized
The units on data processing, creating graphics or audio visual communication are organized based on increasing difficulty of the processes into three levels. In this unit on educational applications also there will be three levels, based on the concepts you will be introduced in different subject areas in the classes 6-8. For supporting learning of these topics you will be introduced to different applications (like Kanagram, Marble or PhET) or different features of the same application (Geogebra) in each of the three levels.
- Level 1 - Learning maths with Geogebra 1
- Level 1 - Building your vocabulary with Kanagram
- Level 2 - Learning maths with Geogebra 2
- Level 2 - Learning geography with desktop atlas KGeography
- Level 3 - Learning maths with Geogebra 3
- Level 3 - Learning geography with a desktop globe Marble
- Level 3 - Learning science with different technology tools
What is the nature of ICT level 1
Objectives
- Understanding the power of digital ICT
- Understanding that ICT are more than only computers
- Understanding that data is of different kinds and can be edited, processed, combined in multiple formats which is what makes it possible to do many things with ICT - Creating with ICT
- Understanding that there are different devices for reading, representing, communicating data -Interacting with ICT
- Understanding of the computer as an ICT device which communicates with data and can connect with other computers - Connecting with ICT
- Getting introduced to the idea of programming and computing
Digital Skills
- Introduction to a range of ICT devices, and specifically the computer
- Handling ICT equipment safely
- Getting familiar with using an operating system for organizing the data on your computer through files and folders; we will work on the Ubuntu GNU/Linux free and open source operating system
- Using input devices for entering data
- Exploring multiple applications for understanding different things ICT can do
- Introduction to the internet, through the world wide web as a method of accessing information
Your learning outputs
- Logs of lessons using applications for keyboard input (handwritten logs and can be typed in a text editor document)
- Images created using Tux Paint
- Concept maps representing your understanding of ICT (hand drawn and digitized)
- A simple text document using a text editor
Activities
- Activity 1 - How is a computer different from a fridge
- Activity 2 - What all can you do with a computer
How is a computer different from a fridge
How is a computer different from a fridge
In this activity, you will develop an appreciation of what the computer is and what makes the computer work.
Objectives
- Getting introduced to the ICT environment
- Understanding the role of hardware and software and what makes digital ICT special
What prior skills are assumed
This is your first activity in the textbook. Enjoy the new subject!!
What resources do you need
- Working computer lab with projector
- Computers installed with Ubuntu Operating System
- Images to show of the computer
- Handout for Basic digital literacy
- Handout for Freeplane
What digital skills will you learn
- Getting familiar with the ICT environment and different kinds of ICT devices
- Operating a computer safely
- Understanding the difference between operating system software and application software
Description of activity with detailed steps
Teacher-led component
- Your teacher may ask you, in small groups, to make a of list all the things a fridge does and a list of all the things you think a computer can do.
- In a group activity your teacher will compile all the group comments in a digital mind map using a concept mapping tool, called Freeplane. She will encourage you to classify the various things the computer will do.
- The teacher will discuss why an operating system is needed and how it works with different applications, for processing your inputs and providing outputs.
- With the help of an image, the teacher will discuss the parts of a computer.
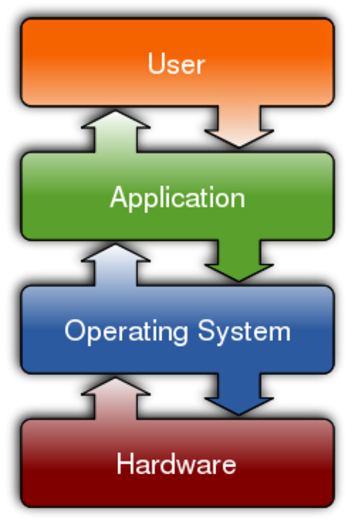
What does an operating system do
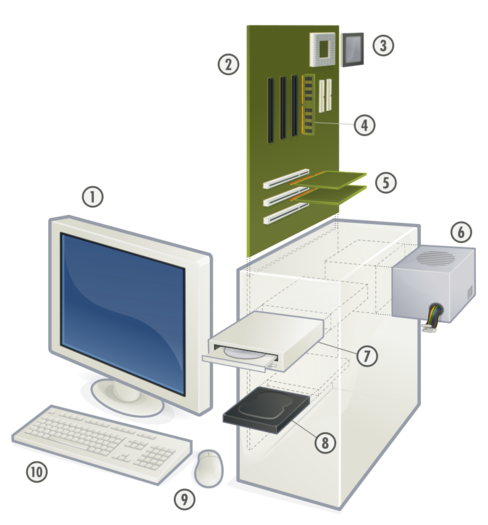
What does a personal computer contain

Motherboard, where all the digital circuits are wired


Do you know the parts of a personal computer. (parts numbered in the image above)
- Monitor
- Motherboard
- Central Processing Unit
- Main Memory - Random Access Memory
- Expansion cards
- Power Supply Unit
- Optical Disk Drive
- Hard Disk Drive (HDD)
- Mouse
- Keyboard
Student activities
- In small groups, with teacher guidance, you can switch on a computer and identify the parts you are familiar with
- The teacher will help you create a folder on your computer, for saving your work done in the class.
- With your friends, compare a mobile phone and the computer and list the things each does. Discuss with your friends if there is any difference.
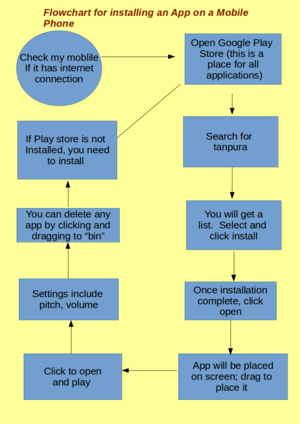
- Develop a flowchart for any activity you have done, or seen someone do. It is better if this is an ICT activity - it can be using the phone, using the computer, playing a video on the TV, etc. See on the side for an example of a flowchart. What you see here is a flowchart for downloading an app on the phone. This has been developed using an application software called LibreOffice Draw, and converted into an image format. You can develop a similar flowchart.
- In groups, you can draw flow charts for the following things (your teacher may discuss additional activities with you):
- Connecting a TV to a cable network
- Using phones to book cooking gas
- Using the farmer SMS service from MKisan portal
- With the help of your teacher, take photographs of the charts and concept maps created, using a cell phone or a digital camera.

Portfolio
We saw earlier that you will keep adding to your digital outputs during this course. You will begin your portfolio collection with the digitized mind maps/ charts.
- Login to the computer (using your personal login, if created or a team login).
- Create a folder with your name in the home folder, and start saving your files.
What all can a computer do
What all can a computer do
In this activity, you will learn about the various things that you can do with ICT and also get introduced to different devices and applications.
Objectives
- Getting familiar with the operating system and navigating files and folders
- Getting familiar with different kinds of applications
What prior skills are assumed
- Familiarity with the computer and being able to operate it safely
- Basic familiarity with files and folders
- Familiarity with the idea of an operating system application software
What resources do you need
- Working computer lab with projector
- Computers installed with Ubuntu Operating System
- Internet availability to demonstrate a web page
- Videos, images to show
- Text documents
- Geogebra files, animations
- Concept maps
- Handout for Ubuntu
- Handout for Tux Typing
- Handout for Tux Paint
What digital skills will you learn
- Getting familiar with the ICT environment; operating system, files and folders
- Learning to work with input devices
- Learning to work with multiple applications
- Text input (English)
Description of activity with detailed steps
Teacher led activity
- Watch the video shown by your teacher and see if any of the applications are familiar to you
- Your teacher will demonstrate a file folder, containing different kinds of files, which are opened by different applications. Some files are stored on your computer and some are not. With your friends, discuss how your teacher opens any file. Your teacher will help you to tabulate this information as follows:
- What is the file name and file extension
- How the application was opened (from the application menu or by right click selecting the file)
- What all did they see on the application
- What input had to be given (for example, opening a browser and typing an URL)
- What controls are available (increase in size, volume, etc)
- Your teacher will also demonstrate the Applications Menu to demonstrate Tux Typing and Tux Paint.
Student activities
On your computers, open the files that have been saved in a folder.
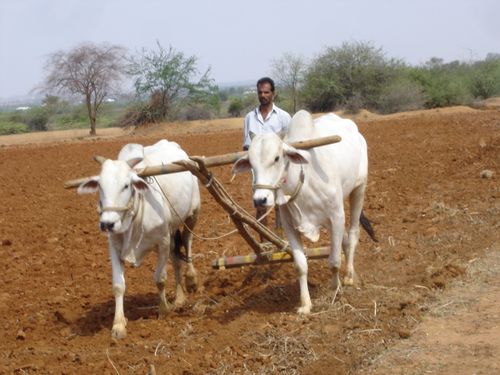
Mahbubnagar district farmer
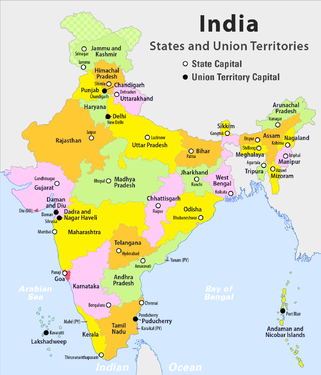
India political map with Telangana
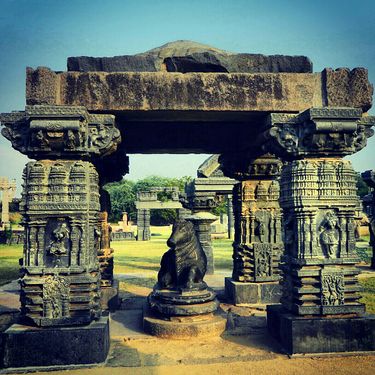
Warangal Fort pillars


Missing Square
|
File:Have you heard of ICT terms.mm | File:Birds in Telugu from Vidyaonline.pdf
|
File:Angle sum property of a triangle.ggb
|
Image credits: YouTube, Geogebra file shared by government high school teacher in Karnataka, Wikimedia Commons. All images are licensed under Creative Commons license which allows for free sharing with attribution. Telugu book from Vidyaonline is free to use for non-commercial purposes.
- As you open each of the files, please make a note of how it opened, what was the file name, what it did. Your teacher will help you document it in a table. Did you get to open different applications on the computer?
- Now, you need to practice with the input devices of the computer so that you can interact with the computer easily.
- Open the Application called Tux Typing and take turn with your friends in a group to practice, this will make you comfortable using the keyboard to type text and numbers. Try to complete all the lessons in Tux typing so that you become comfortable in typing any letter of the English alphabet. You will need to practice the lessons many times. This will also help you in typing in Telugu comfortably.
- Open the Application called Tux Paint and take turn with your friends in a group to practice, this will make you comfortable using the mouse to point items, drag and drop, click the left and right sides of the mouse etc. Becoming comfortable in using the mouse will help you in navigating all applications easily.
- Create your own work folders on the computer, if not done already.
- Create a text document using LibreOffice Writer and type in the names of the applications you have opened.
Portfolio
- Lesson logs of Tux Typing. You can maintain this in your own notebook for this subject. Record the date, lesson learnt and time taken for each lesson. Over a period of time, try and complete all the lessons in Tux Typing. This will help you become familiar with the keyboard, which is useful for using the computer efficiently.
- Files created with Tux Paint. These files will be stored inside Tux Paint.
- Your own text notes/ concept notes that you have developed as part of your exploration of different data.
/level_1_learning_check_list
Check your learning
- Do I understand what we mean by digital technologies?
- Do I know some of the ICT devices that are there today?
- Do I know how to switch on a computer and connect different accessories?
- Do I understand why software is important?
- Am I familiar with using the keyboard and mouse?
- Do I know how to create and manage my folders and files?
Data representation and processing level 1
Objectives
- Understanding data is in the various things we see around us
- Understanding that data can be represented as numbers, text, pictures
- Reading pictures, graphs and plots to make meaning
- Representing findings through concept maps and text documents
Digital skills
- Working with an operating system and interacting with the ICT environment – various devices, applications
- Reading data through images, pictures, photos, maps
- Introduction to text editor and local language typing
- Working with concept mapping application
- Working with text processing application
Your learning outputs
- Concept maps representing your understanding of information that you studied in different formats using a concept mapping tool
- Text documents with your analysis of data
Activities
- Activity 1 - Data can tell stories
- Activity 2 - Organizing data to make meaning
- Activity 3 – A concept map of data
- Activity 4 – Making a text document
Data can tell stories
Data can tell stories
In this activity, you will learn to see different formats of data and try to interpret the data.
Data can tell stories
Objectives
- Understanding that data can be in different formats
- Reading different kinds of data to make meaning
- Analyzing data and expressing
What prior skills are assumed
- Creating folders and saving files
- Opening a given file with the correct application
- Familiarity with using a key board
What resources do you need
- Working computer lab with projector
- Computers installed with Ubuntu Operating System
- Access to internet
- Data in the form of bar graphs, pictographs, maps (images)
- Handout for Ubuntu
- Handout for Tux Typing
- Handout for LibreOffice Writer
- Handout for Freeplane
What digital skills will you learn
- Creating and navigating folders (and sub-folders)
- Opening multiple files with multiple applications
- Text entry (local languages)
Description of activity with detailed steps
Teacher led activity

|
|
.jpg)
Student activities
- On each of the computers, you will find folders with different data sets.
- Each group of students will get one data set to work with - this will comprise maps, satellite images, pictographs and bar graphs. Your teacher will also give you a set of questions for each data set.
- Make a concept map of what you understand with the data
- You can also add your findings in a text document, using LibreOffice Writer. You can enter text in both Kannada and in English
Rainfall

|

|

|

|
India's forests

|

|

|

|
Map of Telangana

|

|

|

|
Story of Godavari

|
.jpg)
|

|

|
Pictographs-qualitative

|

|

|

|
Pictographs-quantitative

|

|

|

|

|
Portfolio
- Make a concept map, as shown by your teacher, to share your findings:
- What is the data about?
- How was the data represented?
- What was special about each representation?
- What did you conclude from the data?
- Have you studied about this before?
- What more do you want to know?
- For the pictographs, make a concept map to share your understanding of the data you studied.
- Once the concept map has been developed on a paper, with the help of your teacher, digitize it and save it in your folder.
How to make data meaningful
Organizing data to make it meaningful
In this activity, you will see how we can identify different components in data and organize in different ways.
Objectives
- Data can be organized for meaning making
- Identifying data elements to capture for organizing data
- Identifying method of organizing that will allow you to answer the questions (building a table for data)
- Understanding the importance of representing data in pictures
What prior skills are assumed
- Understanding of different types of data
- Creating folders and saving files
- Opening a given file with the correct application
- Familiarity with using a key board
What resources do you need
- Working computer lab with projector
- Computers installed with Ubuntu Operating System
- Data in the form of bar graphs, pictographs, maps (images)
- Handout for Ubuntu
- Handout for LibreOffice Writer
- Handout for Tux Typing
- Handout for Firefox
What digital skills will you learn
- Working with different files and applications
- Creating and editing a text document
- Organizing files and folders
Description of activity with detailed steps
Teacher led activity


|
Student activities
Data collection and organizing Now you will create your own data sets based on things around you. You will work in groups with your friends. In this section we will focus on creating data sets in the class. The following activities can be taken up by different sets of students. For all these data sets, make pictographs when possible and also represent in a table form (You can also create table in your text document, and insert the data into the rows and columns).
- Data is about us: Data is about us, around us. To see how, collect the following information about your class:
- Make a list of the kinds of foods eaten in the class over a week - these should be in some categories like sambar, rice, brinjal etc. And tabulate this as pictograph and with numbers. Also list the food groups covered in the diet in each day.
- Find out the favorite movie song of all students in the class and tabulate. Think about how you will ask the question, how you will collect the data and how you will organize it.
- Find out the favorite subject of your class
- Find out the favorite game of the students of your class
- Find out the favorite food of the students of your class
- Know your neighbourhood: Go around your school or home neighbourhood for a survey. Find out the following: the types of houses, the number of household members, the number of houses with school going students, the number of houses with students in college, the number of houses with cooking gas connection.
- Material around us: You collect data on what fabrics things around us are made of. You can also classify and tabulate fabrics by properties. Classifying different kinds of fabrics based on properties.
- Analyse kitchen ingredients as acid or base (your teacher will help you with how to identify an acid or base)
- Profile of the newspaper : Pick 3-4 newspapers from your library. Collect the following data from each newspaper.
- Date of the newspaper.
- Day
- Total number of pages in it.
- Price of the newspaper.
- Name of the editor.
- Number of comic strips/ games/ puzzles/ crossword.
- Number of Letters to editor.
- Number of advertisements.
- Studying the flags of the world: With a collection of flags of various countries, try to organize them based on various parameters like colour, shapes contained, symbols contained and so on. This data can be tabulated for analysis. The flags can be found here.
- Organizing our ICT resources: Revisit the data sets created in the school lab computers for the activity What all can a computer do. Organize the resources in terms of features like size of the file, type of the file, application needed to open it and how this file could be used.
- Making an infographic
- Draw a route map from school to your house
- In groups, make a infographic (sketch) of the following - your school, the local park or playground, your community
- In groups discuss how symbols for infographics can be developed.
Portfolio
- Your data collected, in raw format (it can be photos of your data collection)
- Your data tabulated, this can be done using paper and pen and digitized. In later activities, you will learn how to create this tabulation digitally.
- Your own notes on how you organized the data and what you have learnt; this can be in the form of handwritten notes and digitized. In later activities, you can create this digitally either in the form of concept map or text document.
- Infographic created and digitized
A concept map of my data
Making a concept map of data studied
In this activity, you will express your understanding and analysis of the data you have studied in the form of a concept map.
Objectives
- Understanding concept mapping as a method of expression
- Using a concept map to explain the connections within data, further explorations, etc
What prior skills are assumed
- An understanding that data is of different kinds
- Familiarity with reading multiple kinds of data
- Organizing data and creating data sets
- Working with folders and files
- Keyboard input
What resources do you need
- Working computer lab with projector
- Computers installed with Ubuntu Operating System
- Computer lab with projection equipment
- Handout for Ubuntu
- Handout for Tux Typing
- Handout for Freeplane
What digital skills will you learn
- Introduction to working with a concept mapping tool - creating nodes, linking nodes and adding notes.
- There are different formats in which data can be captured
- Data in one format can be converted to another
Description of activity with detailed steps
Teacher led activity
- Your teacher will take you through a process of explaining data organization and method. For this she will use a concept mapping tool. There are many tools available for creating concept maps; we will use a tool called Freeplane in this textbook.
- We will use an existing data set to work on this. (We will use the languages of India map used in the previous activity)
- Your teacher will discuss with you how you can use the concept map to organize your thinking. She will also show you how a concept map can be used to document an output from a data analysis process. The mind map can be used as an editable concept map file or as an image.
- The concept map can contain information on what the data is about, process of organizing data, how data elements were identified and ideas about what else you want to learn.

File:Languages spoken in India.mm
Student activities
- You worked on different data collection and organizing activities in the previous section. For each data set that you collected, you also worked on a concept map that you digitized. Now, using a concept mapping tool, digitally create a concept map representing the various data elements, and store it in your folder. This will document the possible methods of organizing and representing data. This can be an introduction to data analysis.You can type in the text for the concept map in English or in Telugu or in any other language
- After creating this concept map, export this an image and save it in your folder.
- Export the concept map also as a text document. Open the text document and see how it is formatted by Freeplane.
- Write a short note about what is the difference between digitizing a hand-drawn concept map and digitally creating a concept map.
- Write a short note about how making a concept map helped you in your thinking processes. You can type this in a text document using LibreOffice Writer.
Portfolio
- Your data sets - raw data, tabulated by hand and digitized
- Your concept map of the data analysis in ".mm" format and image formats.
Making a text document
Making a text document of the data analysis
In this activity, you will express and summarize your analysis in the form of a text document, in a simple formatted way.
Objectives
- Understanding that text is also data and can be combined with other formats
- Using a text editor as a method of recording, editing and presenting data
- Understanding that concept map and text document can be combined
What prior skills are assumed
- Text entry with keyboard
- Working with folders and files
- Familiarity with multiple applications
What resources do you need
- Working computer lab with projector
- Computers installed with Ubuntu Operating System
- Handout for LibreOffice Writer
- Handout for Freeplane
What digital skills will you learn
- Working with text document and typing local language
- Inserting images and combining with text
Description of activity with detailed steps
Teacher led activity
- To introduce you to the idea of text input, your teacher will take a sample piece of text and input it in a "gedit Notepad" (a plain text editor) in Telugu and English. See here for sample stories in English and Telugu. This will help you practice text input.
- Your teacher will demonstrate how to create a text document using a text editor application. There are many tools available for creating text documents; we will use a tool called LibreOffice Writer in this textbook.
- You will also learn how to set up your computer for local language typing.
- Your teacher will demonstrate how to organize a text document to communicate an idea, in this case an analysis. We will continue with the same example of languages in India. In this activity, you will also learn how to organize a folder with files, images and concept maps. Watch how your teacher is naming the files.
- Your teacher will demonstrate how to insert an image concept map into a text document and how to add your analysis
- See attached text document that your teacher will show you as a sample.
Student activities
From this activity on-wards, you will get an idea of how a cumulative portfolio works.
In the previous sections, you worked on:
- Collecting data and organizing it (you may have used a text editor to type this in also)
- Digitizing your hand written analysis
- Concept map describing the data you have studied
In this activity you will enter your analysis in a text processor. Your text document will include:
- Title
- A brief introduction to what the document is
- An image of the data used for the analysis, if available
- An image of the concept map used for the analysis (which you created by exporting your concept map as an image)
- Summary of the process of the analysis
Portfolio
- Your concept maps representing your analysis of the data
- A text document with your written analysis of the data with the concept map inserted
/level 1_learning_check_list
Check your learning
- Do I know how to read a map, chart or a graph?
- Do I understand the difference between different kinds of data representation?
- Do I know how to access the computer, enter input, create and save files?
- Do I know how to organize my files into folders?
- Do I know the difference between a plain text editor and text editor?
- Am I familiar with Telugu typing?
- Do I know how to create a concept map?
- Do I know how to create a text file?
Communication with graphics level 1
Objectives
- Understanding story telling as communication
- Developing the ability to read pictures and tell a story
- Understanding that text and images can be combined to make a communication
- Ability to access images, combining to make them into image essays
Digital Skills
- Using different devices/ applications to capture an image using multiple methods – screen capture , camera, mobile phone, snapshot from video, scan, etc. and organizing these on a computer in a folder
- Creating image slide shows
- Combining text and images
Your learning outputs
- Folder with images and pictures
- Image slideshows
- Text documents with images inserted and text added
Activities
- Activity 1 - Photo and image essays
- Activity 2 - Tell a story
Photo and image essays
Creating photo and image essays
In this activity you will learn how to compose a story with pictures.
Objectives
- Capturing an image to tell a story and communicate
- Understanding that a collection of images can be created as an essay
- Getting familiar with different methods of image capture
- Ability to tell a story
What prior skills are assumed
- Ability to handle ICT equipment safely, including mobiles, camera, etc (If needed, a short introductory session can be done by the teacher)
- Familiarity with the ICT environment and managing files and folders
- Text typing in local languages - through concept mapping and text editing
What resources do you need
- Working computer lab with projector
- Computers installed with Ubuntu Operating System
- Camera, mobile, connectors
- Images, photos
- Handout for Ubuntu
- Handout for LibreOffice Writer
- Handout for Freeplane
- Handout for Tux Paint
- Handout for Image Viewer
What digital skills will you learn
- Accessing and creating images - drawing and taking a photo, using the camera to capture and image, using screenshot to capture an image
- Organizing them in folders
- Viewing images
- Combining different formats together - text and image
Description of activity with detailed steps
Teacher led activity
Your teacher will demonstrate how to create an image using multiple methods:
- A photograph with a camera (or a mobile)
- Taking a photograph of a hand-drawn illustration with a camera or mobile
- A screenshot or a snapshot from a video playing
She will also show you how these images can be copied to the computer.
Single image essay
|

Multiple image essays - timeline
- How does a place change in hundred years

James Street 1880
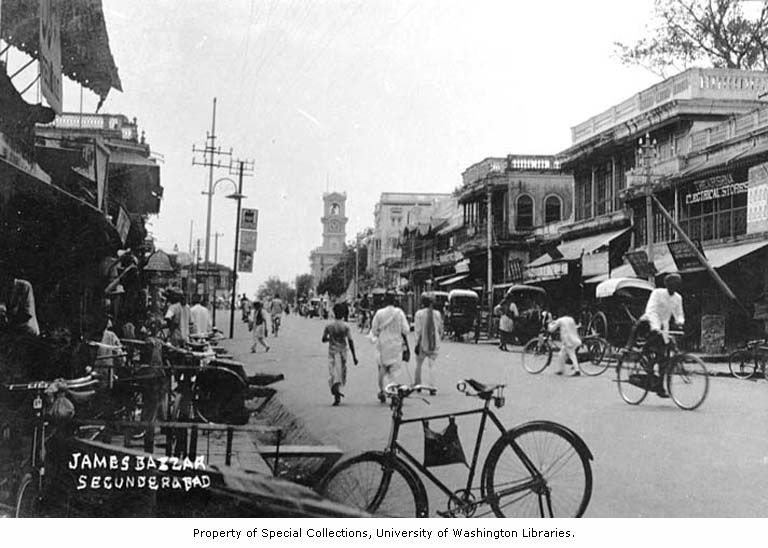
James Street 1920
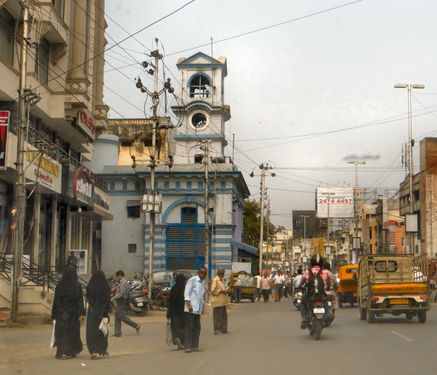
James Street 2000


- You have already seen different kinds of images like timelines or infographics that can also be used to tell stories. Discuss with your teacher how to capture a timeline of an activity. For example, what story can you tell from these pictures?
- What are the different ways in which you can capture time line of an activity? How can you identify a place from pictures? How many different ideas can you pick up from the pictures?
- Is there a difference between story telling with a single picture and story telling with multiple images?
- Watch how the teacher opens multiple pictures; your teacher will demonstrate how to make an image slide show for viewing multiple pictures.
Multiple image essays - capturing moments
- What are the feelings here
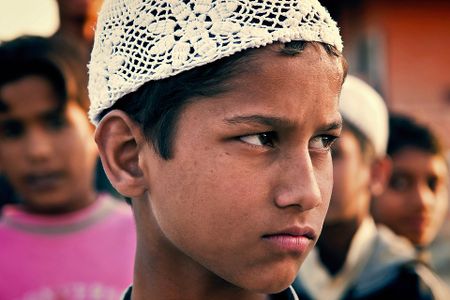
A child thinking

Muslim boy eating during Ramadan
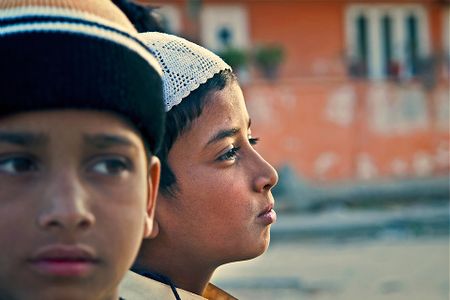
I like sweets


- Your teacher will show you this next set of images. You can work in groups and discuss with about what stories you can build from these pictures.
- Think about whether there is any difference between this story and the previous story on time line. What is the difference you see and why do you think it is different?
Before starting your own activities, discuss with your teacher how to capture photos and images of places and people that will tell stories on their own.
Student activities
- Make an image essay of any local festival or fair. You can get a collection of 3-5 images (you can either draw them or photograph them) and show them as a slideshow. These images are your story! You use your imagination to tell the story you want, from these images.
- You have studied about natural fibres in your science class. In your community, identify local craftsmen/ occupations/ industry/ shop that makes or sells products using various natural fibres. Examples can include thatching, basket weaving, fabric weaving, dyeing. Find out how these activities are done and develop a picture story.
- Create a picture time line of the following in groups and discuss your creations:
- Day in the school
- Preparing for Dussehra
- A timeline of the Samakka Saralamma Jatra
- Mission Kakatiya
Portfolio
- Your collection of images - organized in a folder
- You would have imagined the story line and developed some ideas for telling a story. Type the story line into a text document.
Tell a story
Telling a story from pictures
Objectives
- Adding narratives to a picture essay
- Building language communication skills - including in multiple languages
- Building skills of creative interpretation and expression
What prior skills are assumed
- Capturing images from different devices (Mobiles, Cameras, videos)
- Importing images from the devices (Pen drives, Memory Cards, CD's and DVD's)
- Organizing images on the computer
- Familiarity with text editor - basic text entry, inserting images into a document
- Local language typing
What resources do you need
- Working computer lab with projector
- Computers installed with Ubuntu Operating System
- Camera, mobile, connectors
- Images, photos
- Handout for Ubuntu
- Handout for LibreOffice Writer
- Handout for Freeplane
- Handout for Tux Paint
- Handout for Image Viewer
What digital skills will you learn
- Local language text typing
- Combining images and text
- Simple formatting and layout
Description of activity with detailed steps
Teacher led activity
Pictures to describe a place
Your teacher will demonstrate how to tell a story with a set of images. In your lab computers, you will find the following images of a railway station (Warangal railway station). You must work on this in groups and make your stories. Compare your stories at the end of the class.
- Warrangal station in pictures
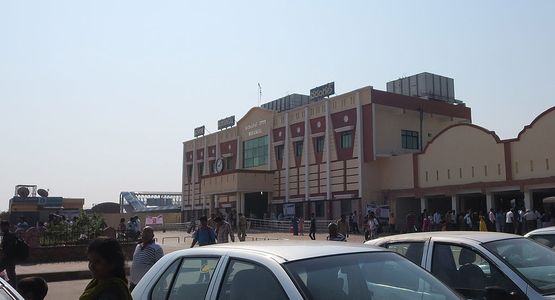
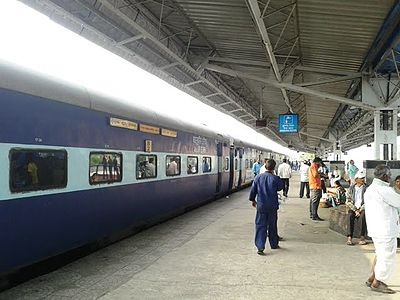
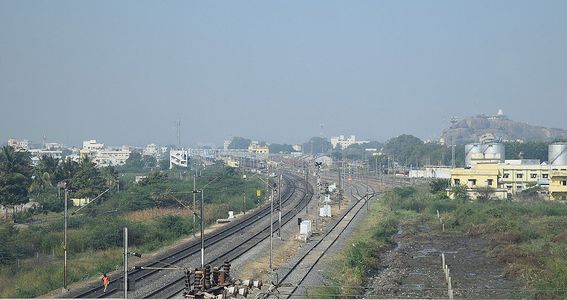


Using pictures to tell a story
- The story of food
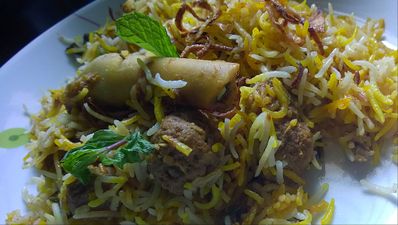
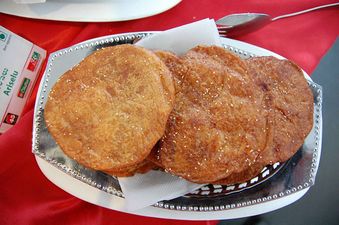
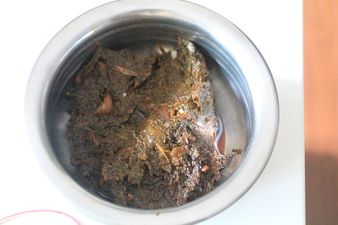


- Your teacher will discuss with you how to use this set of images to talk about how food habits of the state of Telangana. Some ideas that you can discuss with your teacher are:
- How does the weather and local vegetation shape our food and recipes?
- How does caste impact food habits?
- How does the economic condition impact food habits?
- Using these pictures you can also trace how food habits change in a community or culture
- You can put your ideas in a concept map first, before you write out your story. You can make it a habit to prepare a concept map before every article or story you write. The concept map will help you write out all the ideas/concepts you want to cover, and help you place them in relationship to one another. Since you can create or move the nodes easily in a digital concept map, this will help you think in an iterative manner to revise and refine your ideas well before you actually write it out.
Given story line

- Your teacher will show you this image in class and will discuss with you how to develop a story
- You will notice that in this case your story has been given; you need to add a text narrative to the story
Discuss with your teacher the difference between the two story telling exercises.
Student activities
- Go back to your photo and images from the previous activity. For each one of the image essays, add a text description to describe your image. After making a slideshow, insert the images in a document and type a phrase describing the picture. These images are your story! You use your imagination to tell the story you want. You need not be restricted to reality, you can use your imagination for fiction and imaginary stories as well.
- In your local habitats - lake, pond, field, dry land -find out the animals that live there and develop a food chain infographic. You can either illustrate the images for the infographic or photograph them.
- Capture photographs of food wastage in functions and hotels and tell a story
- If there are garbage heaps in your locality, take photos of them. Write an essay on Making my Bharat Swacha, describing the problem and possible solutions.
- Take photographs/ collect photographs of local leaders and make a biographic. The biographic should have 5 images of which at least 1 should be an illustration (draw and take a photo).
- You will save your images for one topic in one folder. You can do a slide show of the images. By default the Image Viewer will show the images in the order you have saved. You can also change the display order by naming the images with numbers. You can present the slide show to the class and narrate the story as the images move. You can also do an automatic slide show
Portfolio
- Your collection of images (from camera, or drawn and digitized)
- Image albums organized into a slide show
- Your picture stories of images created
- Infographics of local habitat and water cycle
- Concept map of the story
/level 1_learning_check_list
Check your learning
- Do I know how to create images using multiple devices and applications?
- Can I organize my images in a folder?
- Can I present a slide show of images for a story?
- Have I enjoyed telling a story with my pictures?
- Do I know how to add a good description for each of my images?
- Do I know how to develop a story board - with a sequence, with sets of images, with suitable text - and develop an output?
- Can I make my own graphics communication for myself, my school or my village?
= Educational_applications_for_learning_your_subjects_level_1 =ಕನ್ನಡ
Check your understanding
Geogebra
- Do I know how to open Geogebra, create a sketch and save the file?
- Do I know how to draw the different geometric constructions like line, line segment, polygon, measurement of length and angle?
- Do I understand the difference between algebraic and geometric view?
- Have I learnt how to format the constructions?
Kanagram
- Do I know how to work on Kanagram and identify words from a word jumble?
- Do I know how to add a word (or words) to a category on Kanagram on my computer?
- Do I know how to add a category and words within that category?
Building vocabulary with Kanagram
Jumbling the word
In this activity, you will play 'jumbled' word game, and identify meaningful words from a jumble of the letters. You will also create simple word lists for a category of words.
Objectives
- Playing with the word lists to test your and your friends' vocabulary
- Build new vocabularies with the tool in English and in Telugu
What prior skills are assumed
- Handling ICT equipment
What resources do you need
- Working computer lab with projector
- Computers installed with Ubuntu Operating System
- Computer lab with projection equipment
- Handout for Ubuntu
- Handout for LibreOffice Writer
- Handout for Kanagram
What digital skills will you learn
- Navigating an educational software application
- Creating vocabulary lists for different word categories in English and Telugu
Description of activity with detailed steps
Teacher led activity
- Your teacher will show how to use Kanagram and how to guess the right word from the jumble
- She will demonstrate how you can create a vocabulary list for a word category and provide the 'hint' for each word
Student Activities
- You can work with Kanagram to check your vocabulary for a given item collection
- You can build a vocabulary list for Telangana Festivals, water bodies, vegetables, flowers, districts, mandals etc.
- You can build a vocabulary list for the poem In the Bazaars of Hyderabad.
- You can build a vocabulary list for a poem in Telugu
Portfolio
- Vocabulary lists created by you (you can create and save this in a text document, in a tabular format, with columns as follows:
- Word category (e.g. District names)
- Correct word (e.g. Medak)
- Jumbled word (e.g. dekam)
- Hint (Gulshanabad)
Learning maths with Geogebra 1
Objectives
- Understanding the working of an interactive environment like Geogebra
- Getting familiar with different features for creating and working with Geogebra sketches
- Exploring different mathematical concepts with Geogebra, thus experiencing mathematics
Digital skills
- Working in an interactive environment through the use of different functionalities
- Being able to visualize how to give inputs in a programmable environment
- Working with Geogebra to create sketches as well as play around with given sketches
Your learning outputs
- Geogebra files demonstrating your creations
- Screenshots of sketches you have created using Geogebra
Activities
Drawing_with_Geogebra
Drawing with Geogebra
In this activity, you will explore free the drawing pad of Geogebra and create different sketches.
Objectives
- Understanding how the different tool bar functions work in Geogebra
- Being able to create free hand sketches of geometric shapes
- Recreating given objects using different functionalities in the Geogebra tool bar
- Building a library of Geogebra files for further learning
What prior skills are assumed
- Opening different applications and creating folders and saving files
- Familiarity with using a key board
- Control in using a mouse or track pad
What resources do you need
- Working computer lab with projector
- Computers installed with Ubuntu Operating System
- Computer lab with projection
- Access to internet
- Handout for Ubuntu
- Handout for Geogebra
What digital skills will you learn
- Learning to work with interactive applications, with given input
- Creating, saving files with Geogebra
Description of activity with detailed steps
Teacher led activity
After introducing you to how to open the Geogebra file, your teacher will demonstrate two pictures sketched using Geogebra.
- Sketching with Geogebra
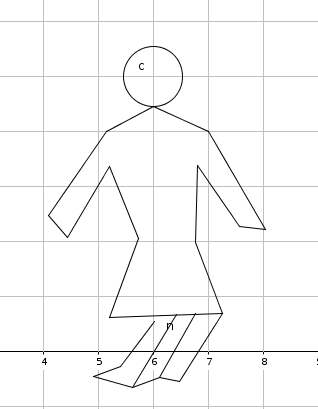
Sketch 1 using Geogebra
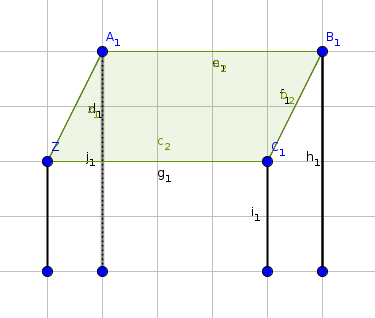
Sketch 2 using Geogebra


Watch and observe the various functionalities she uses. This will include the following:
- Using the different geometric shapes visible on the tool bar
- Defining the drawn objects as a shape (or a polygon)
- Rotating and moving objects
- Showing and making invisible the labels of points
- Formatting objects drawn
Student activities
- Create the following free sketches (or any other sketch of your choice) with Geogebra and save the images as well as the file
- Tree
- House
- Car
- Suitcase
- Well
- Draw the following given sketches using Geogebra. With a set of 3,4,5,6,7,8 segments try to draw various polygons. And define the polygons drawn as an object. After drawing the polygons, move the vertices and rotate the polygons. Is it possible to change the vertices? Observe what changes in the polygon.
- Look at the following images and try to create these using Geogebra.
Create multiple images using tool bar

Similar-geometric-shapes

Create multiple images and arrange them
Fabric

Puzzle

.png)
Portfolio
- Your library of Geogebra files
- Your screenshot images of sketches created in the Geogebra files
Getting_introduced_to_lines_and_angles
Getting introduced to lines and angles
In this activity, you will explore how angles are formed and the different kinds of angles
Objective
- Using Geogebra to accurately construct and label geometric figures
- Visualizing how angles are formed
What prior skills are assumed
- Basic familiarity with the Geogebra tool bar and the different features
What resources do you need
- Computer lab with projection
- Access to internet
- Handout for Ubuntu
- Handout for Geogebra
- Geogebra files for demonstration
What digital skills will you learn
- Learning to work with interactive applications, with given input
- Creating, saving files with Geogebra
- Accurately drawing and measuring geometry figures
Description of activity with detailed steps
Teacher led activity
From this activity on, you will use both the algebra and the geometry view of Geogebra to systematically study various ideas in geometry. Have you wondered why this tool is called Geogebra? Look at what happens to the Geogebra window, when you create/ draw something. As you draw a figure, the algebraic way of writing that figure is also displayed in the window.
You will use the following Geogebra files which for this lesson.
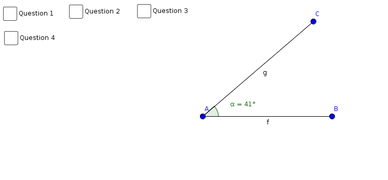
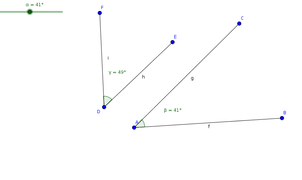
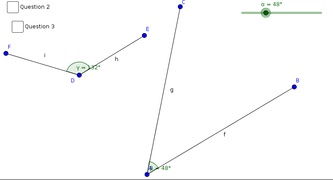
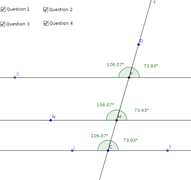
Your teacher will demonstrate the following to you:
- Plotting a point - observe how she plots and what happens to the algebraic view
- Drawing a line and line segment
- Measuring the angle when the lines intersect
- Demonstrating angle formation by rotation and the distinction between clockwise and counter clockwise rotation. Can you guess for a minute what would happen if these were not treated differently? Discuss this with your friends and teacher
- Drawing parallel lines and perpendicular lines
- Demonstrating angle pairs
Student activities
After the demonstration you will construct the following:
- Two intersecting lines with all angles marked
- An angle being formed by a rotating segment
- Formation of supplementary and complementary angles
- A pair of parallel lines with all angles marked
Portfolio
- Your completed Geogebra files will be the addition to your digital portfolio.
= Level 1 learning check list =ಕನ್ನಡ
Check your understanding
Geogebra
- Do I know how to open Geogebra, create a sketch and save the file?
- Do I know how to draw the different geometric constructions like line, line segment, polygon, measurement of length and angle?
- Do I understand the difference between algebraic and geometric view?
- Have I learnt how to format the constructions?
Kanagram
- Do I know how to work on Kanagram and identify words from a word jumble?
- Do I know how to add a word (or words) to a category on Kanagram on my computer?
- Do I know how to add a category and words within that category?
What is the nature of ICT level 2
Objectives
- Understanding that science and technology is an evolving process
- Trace the history of science and technology
- Locating the history of ICT within this
- Understanding that ICT has evolved/ evolving
- Awareness about the social aspect of ICT
- Understanding technology safety and ethical use
Digital Skills
- Understanding the distinction between digital and non-digital technologies
- Familiarity with the ICT environment and multiple applications
Your learning outputs
- Demonstrated familiarity with input devices through lesson logs
- Picture stories to represent student conception of technology
- Text document with images to demonstrate student understanding of the evolution of technology
Activities
- Activity 1 - When did it all begin
- Activity 2 - The human story behind the computer
When did it all begin
When did it all begin
In this activity, you will learn about how different devices for calculation and computation were developed, leading to the modern computer
Objectives
- You must be familiar with different ICT terms
- You must be able to work with different applications - text editor, concept mapping tool, independently
- You must be able to access, open, create and save files in your folder
What prior skills are assumed
- Comfortable interacting with the ICT environment
- An understanding of what computing is and the different things ICT can do
- A working understanding of ICT hardware and software
- Familiarity with text and image processing applications on the computer
What resources do you need
- Working computer lab with projector
- Computers installed with Ubuntu Operating System
- Access to the internet
- Pictures and slide show for the time line activity
- Handout for Firefox
- Handout for LibreOffice Writer
What digital skills will you learn
- Basic understanding the development of technology
- Basic understanding the difference between analog and digital technology
- Understanding how a cell phone works
- Getting introduced to the impact of technology on society
Description of activity with detailed steps
Teacher led activity
- Your teacher will read with you the following section of the textbook and discuss how different technologies for measurement led to the idea of computing
- She will also discuss how programming a device became important
- Introduction to science and technology
- Introduction to ICT
- Analog and digital technologies
- How did the cell phone develop
- Your teacher will show the below pictures and discuss with you the different points of evolution of ICT. She will discuss how society shapes and can be shaped by technology. You will also learn about the technology developments that led to the computers and cell phones
Video of the above timeline:
Student activities
- Discuss with your friends and in small groups identify any one technology that you are aware of (ICT related technology)
- With illustrations, created using tux paint, or drawn on paper and digitized by taking a photo of the same using a mobile phone, and text, using LibreOffice Writer develop a timeline of the technology.
Portfolio
- Your picture story of the development of technology (drawn and digitized)
The human story behind the computer
The human story behind the computer
In this activity, you will learn about different computing technologies developed and also about a person named Alan Turing who developed a theory of how computers can be built
Objectives
- You must be familiar with different ICT terms
- You must be able to work with different applications - text editor, text processor, mind mapping tool, independently
- You must be able to access, open, create and save files in your folder
What prior skills are assumed
- Comfortable interacting with the ICT environment
- An understanding of what computing is and the different things ICT can do
- A working understanding of ICT hardware and software
- Familiarity with text and image processing applications on the computer
What resources do you need
- Working computer lab with projector
- Computers installed with Ubuntu Operating System
- Access to the internet
- Pictures and slide show
- Handout for Firefox
What digital skills will you learn
- Basic understanding of how programming and computing developed
- Basic understanding of how computers have impacted the society and how society determines technology
Description of activity with detailed steps
Teacher led activity
- Your teacher will read with you the section of the textbook on science, technology and society and discuss how different technologies for measurement led to the idea of computing
- Your teacher will read the following section What can ICT do and discuss with you ICT impacts different people.
- Your teacher will discuss with you the story of Alan Turing and the story of Enigma, the World War machine
| Your teacher will play this Slide show of The story of Enigma. She will discuss with you how this machine was developed during the second world war to decode the German messages. Alan Turing was called the code breaker.
Though Britain and its allies broke the German code, they could not openly declare this because they did not want Germany to know. This meant that the team doing the computing had to take decisions on when to allow an attack to happen without defence (so that Germany would think that its code was not broken). Can you imagine taking such decisions? |


Student activities
- Discuss with your friends and in small groups identify any one technology that you are aware of (ICT related technology)
- With illustrations and text, develop a story of how the technology began, what need of society it addressed, how it is available now, how the technology has changed the way we do things and what is the future of the technology
- Are you aware of any technology that has disappeared?
- Look around your neighbourhood and identify an occupation / craft. Write a short note about how technology can impact the person and the occupation. Develop a picture story to describe your imagination of what technology can do to the occupation. Your teacher may also ask you to type this in a text document.
- Profile some person in your school, family, community who has been associated with some technology and has been using it.
Portfolio
- Your picture story discussing the human being - technology connection
- Your text document with your description. The text document should have a full and meaningful name, such as 'Impact of ICT on farming, <your name>, year-month.odt'.
- Your text document on the biography of a person associated with any given technology in your neighborhood.
Level 2 learning check list
Check your learning
- Do I understand the difference between digital and non digital technologies?
- Am I able to understand the impact of ICT on different things I do - the way I study, the way my parents work, the way people talk to one another, the way businesses run and many more?
- Am I able to understand how people influence technology?
- Do I see myself as a part of the technology society?
Data representation and processing level 2
Objectives
- Understanding number patterns
- Using spreadsheet to organize data, analyse data and represent data
- Using concept maps and text documents to output data analysis
- Understanding how visualization allows us to see how data behaves, what conclusions can be drawn
Digital skills
- Using a spreadsheet to collect data and organize data
- Using a spreadsheet for simple data analysis and making charts
- Studying graphs
- Presentation of output with concept map, text document
Your learning outputs
- Your data sets captured using spreadsheet
- Using a text document to summarize data analysis with charts and tables
- Using a concept map with links between concepts
Activities
- Activity 1 - Columns and rows
- Activity 2 - Numbers and patterns
Columns and rows!
Learning to input and represent data using a spreadsheet
In this activity, you will learn to input data in a spreadsheet and also represent data graphically.
Objectives
- Learning data input with spreadsheet
- Making data analysis and summary with spreadsheets
- Make plots and charts
What prior skills are assumed
- Familiarity with ICT environment
- Understanding of data organization
- Keyboard input (text editing)
What resources do you need
- Working computer lab with projector
- Computers installed with Ubuntu Operating System
- Computer lab with projection equipment
- Student generated data sets
- Secondary data sets
- Handout for LibreOffice Calc
- Handout for LibreOffice Writer
What digital skills will you learn
Description of activity with detailed steps
There are two parts of this activity. The first part is to get familiar with entering data in a spreadsheet. The second part is to learn how to analyse data from a spreadsheet, using secondary data sets.
Teacher led activity
Getting familiar with spreadsheet
- Your teacher will demonstrate input of data with spreadsheet
- Discuss with your teacher what meaningful measures of data can be calculated
- Your teacher will show you the following in a spreadsheet:
- Opening LibreOffice Calc and demonstrating how to create a new spreadsheet
- Entering data in a spreadsheet - typing in Kannada and English
- Sorting (alphabetically or numerically) the data
- Simple formatting in a spreadsheet - coloring of cells, making bold, cell borders
- Entering simple formulae in a spreadsheet to calculate data; some of the formula to be calculated include total, percentage, minimum, maximum
- Drawing charts - bar graphs and pie charts - in a spreadsheet
- Copying the table of data entered and inserting into a text document
- Inserting the graphs and charts entered into a text document
- Your teacher will plot different graphs and discuss how different kinds of graphs can be meaningful. Look at the graphs shown here and determine the advantage of each.
- Your teacher will also discuss with you what is the difference between the data set in the first and second example.
Example 1


Example 2


Example 3

Student activities
Tabulating data from a pictograph:
Look at the following data sets captured and tabulate in a spreadsheet. Plot the graph that will make meaning to the data.
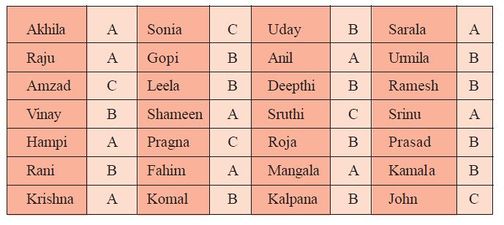
Grades of students

Coin collection by day
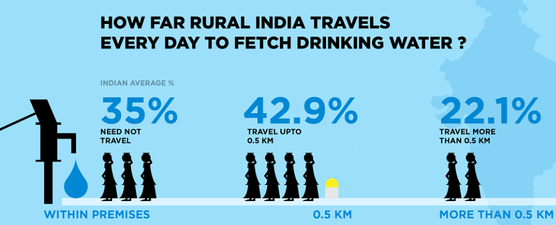
Access to water


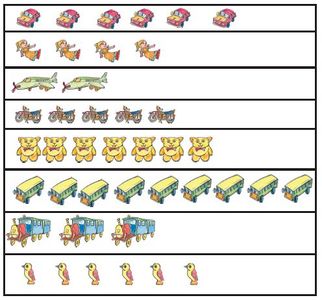
Pictograph
How people travel

How do tourists spend
Key for pictograph

Entering given numeric data in a spreadsheet:
Look at the following data sets captured and tabulate in a spreadsheet. Plot the graph that will make meaning to the data. It could be a bar chart or a pie chart. You can see that spreadsheet offers many other types of charts. You should explore these charts for your given table of data and try to understand what they say.

India's population by religion
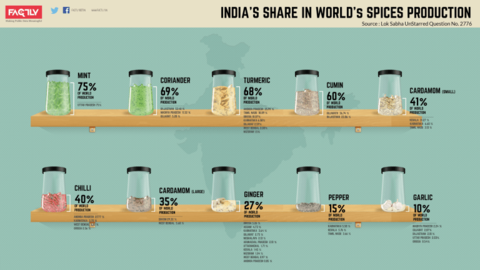
India's share in world's spices production
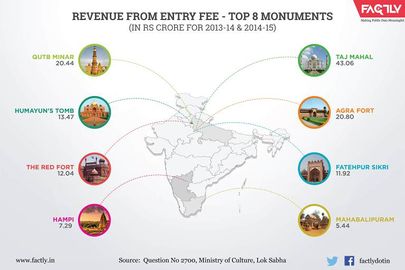
Revenue from Entry Fee from Top 8 Indian Monuments


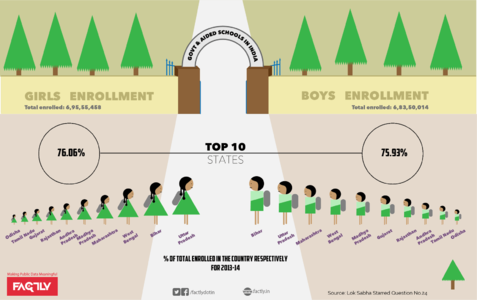
India School Enrollment Statistics
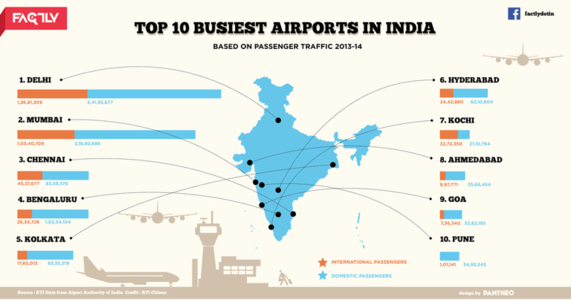
Top 10 Busiest Airports in India
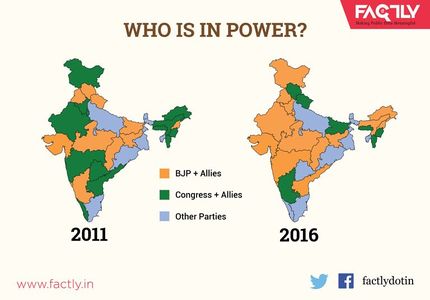
Who is in power


Tabulating collected data from previous activity on organizing data
In the previous activity on organizing data you had collected the data on various kinds of projects. You had also created a concept map and a text document describing your data collection and processing. As a part of this unit, you should enter the data you collected in a spreadsheet, sort, format and also calculate some simple measures of data. You should also add a pictorial or graphical representation of the data.
In the previous activity on organizing data you had created a text document with concept map and a written description. You can add the spreadsheet data into your document along with the charts.
Portfolio
- You will add to your folder in this activity a new data format called spreadsheets. The spreadsheets you will create will be your digital portfolio.
- Cumulative text document with spreadsheet and chart(s) inserted.
Numbers and patterns
Numbers and patterns
In this activity, you will explore the fun in numbers and mathematics, using the spreadsheet software
Objectives
- Understanding that numbers are data and they represent data
- Working with spreadsheet to decode number patterns
- Working with spreadsheet to create number patterns
What prior skills are assumed
- Familiarity with the ICT environment and various applications
- Comfort with data input methods
- Entry into spreadsheets
What resources do you need
- Computer lab with projection equipment
- Number patterns worksheets (for students to explore, create)
- Handout for LibreOffice Calc
- Handout for LibreOffice Writer
- For additional reference - PK Srinivasan's Romping in Numberland
- For additional reference - PK Srinivasan's Fun with calendar
What digital skills will you learn
- Working with spreadsheets for entering numbers
- Getting familiar with simple operations in a spreadsheet
Description of activity with detailed steps
Teacher led activity
How much fun in calendar!!
|

Number puzzles
Your teacher will discuss the following number puzzle with you. See if you can solve the last equation by doing different operations on the numbers. The following symbol ‘*’ is used to indicate the operation.
- Number puzzles
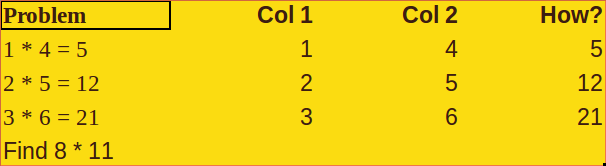
Number puzzle 1
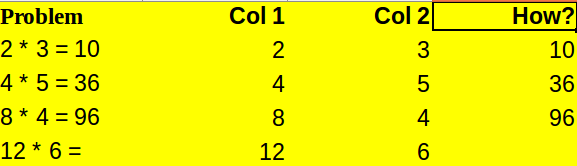
Number puzzle 2
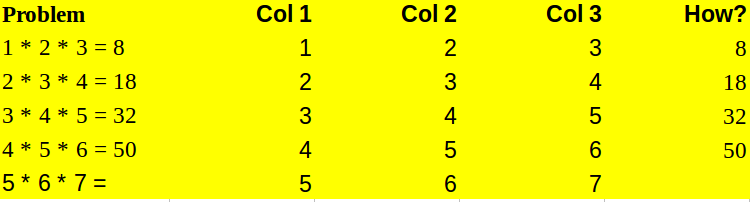
Number puzzle 4
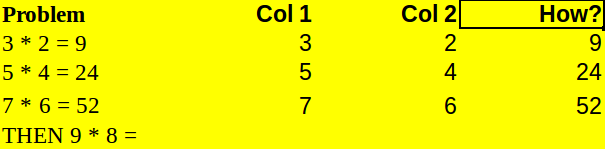
Number puzzle 3


Algebra made easy
Look at the following columns and numbers on each one of the pictures. Work with your teacher to find out what is the relationship between the columns (x) and (y). Can you state it like an equation? Have you studied this in algebra? You can create your own patterns and see how numbers behave!!


Student activities
- Make more calendars and explore the patterns; your teacher may do this in groups with you.
- Your teacher will give you patterns for you to create using spreadsheet and explore.
- Investigate a set of triangular numbers with a spreadsheet
- Investigate triads of of consecutive numbers
- Sum of a set of consecutive numbers
- Product of a set of consecutive numbers
- End product of a set of consecutive numbers
- End product of a set of consecutive numbers divided by the middle number
- Investigate four consecutive numbers
- Sum of end numbers
- Sum of middle numbers
- Product of end numbers
- Product of middle numbers
Portfolio
- Calendar explorations in a spreadsheet
- Your spreadsheet files
Level 2 learning check list
Check your learning
- Do I know how to enter and organize data in a spreadsheet?
- Do I know how to play around with data in a spreadsheet?
- Do I know how to sort the data?
- Do I know how to calculate different data measures using formula?
- Do I understand why data organized in tables and fields is useful?
- Can I make and discover patterns with spreadsheets?
- Can I make a text document with charts, data tables inserted?
Communication with graphics level 2
Objectives
- Understanding story telling as communication
- Developing a story line and identifying ideas for insertion of images
- Understanding that images are formats of data that can be edited and combined with other formats
- Understanding that text and images can be combined
- Using digital art creations to tell a story
Digital Skills
- Using a concept map to develop a story line
- Capturing images (taking a photo of a drawing or an object)
- Creating digital images (using software to draw)
- Combining text and images
- Entering text in multiple languages
- Learning image editing
Your learning outputs
- Text document with your story and song
- Folder with images and pictures
- Image slideshows
- Illustrated document of stories and songs
Activities
- Activity 1 - Stories and songs come alive with pictures
- Activity 2 - Creating animations
Stories and songs come alive with pictures
Stories and songs come alive with pictures
In this activity, you will illustrate songs and stories with pictures
Objectives
- Adding illustrations to a story
- Building language comprehension and expression skills, encouraging multi-lingual expression
- Expansion of vocabulary through building a pictionary
- Ability to develop graphics communication for varied contexts - including local issues
What prior skills are assumed
- Creating images and organizing in folders
- Familiarity with text editor - basic text entry, inserting images into a document
- Local language typing
What resources do you need
- Working computer lab with projector
- Computers installed with Ubuntu Operating System
- Cameras, mobiles
- Handout for Ubuntu
- Handout for Tux Paint
- Handout for MyPaint
- Handout for LibreOffice Writer
- Digital copies of the stories and songs to be used for illustration
- Some images downloaded and saved for adding illustrations
What digital skills will you learn
- Creating with digital art tools
- Capturing images from the application and organizing
- Composing a picture story book with images and text
Description of activity with detailed steps
Teacher led activity
- Your teacher will read a story "Town Mouse and Country Mouse" in class. Then you will work in small groups to identify the ideas to illustrate. The text of the story will be on your folder in the computer lab.
- You will work on your illustrations in different groups.
- Your teacher will demonstrate the use of Tux Paint for creating images and capturing the images for building the illustration.
- She will demonstrate how to add images alongside the text for illustrating the story.
- Your teacher will also discuss with you how to develop alternative endings to the story and you can illustrate the different endings. An example of an illustrated story book is available here.
- At the end of the exercise, exchange your illustrated stories. Suggest to others how they can further improve the illustrated stories.
Student activities
- Your teacher will allocate 4 stories and 4 poems to the class for illustrating.
- Decide what pictures to draw, draw and color them and combine with text to create the story
- Talk to the elders in your community and ask them to tell you a local story - it can even be of a tree or the temple or the lake. You write down the text for the story as they narrate. Illustrate your local history story book. Ask your elders to sing or narrate the lyrics of one song to you. You write down the lyrics and illustrate your own family or community song.
Portfolio
- Your illustrations for the stories using a digital art creation tool
- Image albums and the digitized text of the song
- Your own illustrated story book combining text and images
Creating animations
Creating animations
You will work with a digital art creating tool to create animations.
Objectives
- Understanding the principle of animations
- Creating simple animations
- Creating animated stories
What prior skills are assumed
- Understanding that images are another form of data and images can be used to communicate
- Familiarity with creating images using Tux Paint
What resources do you need
- Working computer lab with projector
- Computers installed with Ubuntu Operating System
- Handout for Ubuntu
- Handout for TuxPaint
- Some source pictures for animations can be made available. They can be downloaded from here.
What digital skills will you learn
- The basic principle behind an animation
- Working with digital art tools
Description of activity with detailed steps
Teacher led activity
In this fun activity you will understand how to create animations and discover what magic lies in your hands for creating animations.
| Watch the following image: | Watch the following video: |
|---|---|
|
|

Can you see if there is any difference between the two? Your teacher will explain to you how animations are made.
She will demonstrate with the help of Tux Paint how to create simple animations.
To see this for yourself you will work with the following images.
Your teacher will demonstrate the following:
- Adding existing images to the Tux Paint folder for editing within the application
- Creating images with minor changes to create an animation
- Numbering images for playing as a slideshow
- Playing the slideshow for creating an animation
Animation with incremental changes
- Animation of a moving boy
- 1.Simpleanimation1.png
- 2.Simpleanimation2.png
- 3.Simpleanimation3.png
- 4.Simpleanimation.png
- 5.Simpleanimation5.png
- 6.Simpleanimation6.png
- 7.Simpleanimation7.png
- 8.Simpleanimation8.png
Animated story with multiple pictures
- The seed became a forest
- Animation1.png
- Animation2.png
- Animation3.png
Student activities
- Using Tux Paint, create an animation with a base picture, small changes and movements to build an animation
- Using Tux Paint, create an animated motion picture with multiple images.
Portfolio
- Your image gallery of Tux Paint created files
- Presentation of the Tux Paint images as an animated slideshow
Level 2 learning check list
Check your learning
- Have I learnt how to create digital images using digital art applications?
- Do I know how to develop a story line and identify areas for combining images?
- Can I organize my images in a folder for a given text, to accompany or illustrate a story or a song?
- Have I enjoyed illustrating my story with my pictures?
- Do I understand how animations work?
- Can I make a simple animation?
- Can I make my own graphics communication for myself, my school or my village?
Audio visual communication level 2
Objectives
- Understanding that audio is a form of communication - both verbal and non-verbal
- Being able to record audio with multiple devices
- Understanding audio can be combined with words to communicate a message for sharing and for self learning and peer learning
Digital skills
- Audio recording using multiple devices - sounds (non verbal), narration
- Audio story telling
- Combining and editing audio files
Your learning outputs
- You will create audio clips of sounds that you record
- Recordings of oral narration
Activities
- Activity 1 - Audio story telling
- Activity 2 - Combining sounds and words to tell a story
Audio story telling
Audio story telling
In this activity, you will create an audio story.
Objectives
- Using multiple devices to record a sound
- Organizing recordings as files on folders and playing
- Ability to create an audio communication
What prior skills are assumed
- Handling ICT equipment
- Managing files and folders
- Using recording devices (mobile phone, computer, audio recorder)
Resources needed
- Working computer lab with projector
- Computers installed with Ubuntu Operating System
- Recording device
- Speakers
Digital skills
- Using multiple recording devices to record
- Organizing recordings (audio files) on folders
- Using players to listen to the audio
Description of activity with detailed steps
Teacher led activity
So far you have seen how numbers can tell stories, how pictures can tell stories, how you can write a story with words. Now you will explore how you can tell a story only with sounds and a combination of sounds and words. Pause here for a minute to think - when you speak, are you using sounds or words to communicate?
In this activity, your teacher will introduce you to sounds and voice narration to understand how you can communicate using audio methods.
Listen to the sounds with your teacher. The audio files are saved in your folder; see what is the extension of the files.
Is is possible for you to tell a story that can describe the sounds? Your teacher will ask you to try this in groups and compare the stories.
Now with your teacher, listen to the following audio.
|
|
Is there a difference? What was the second audio about? Yes, it was a story.
Audio story telling can be in two ways, as you saw. Discuss with your teacher what difference you noticed when you made stories for the sounds and when you listened to a story. Your teacher will talk to you about oral history of people and places.
Student activities
- You can go around a kitchen (yours and your friends) and record the sounds of food being prepared. Can you tell stories from the kitchen? You can find out how your most favorite food is prepared, by asking your parents and record the process.
- Record other sound "bites": your teacher could allocate this to you or you could do in groups
- From your poultry farm
- From the fields
- From the community well
- From the local shop
- From a place of workshop
- From a market
- You can also illustrate the stories that come to your mind when you have recorded the sounds.
- Record the history of any place, person, event or tree or building in your local community by speaking to the elders in the community. Record the story they tell.
- You can check the size of your audio files on your computer. Are they much bigger than the size of text files?
Portfolio
- Your audio clips of sounds
- Your illustrations of the stories from your sounds (can be digital art files, photographs or digitized hand drawn illustrations)
- Your audio narration of a local history (audio file)
Words and sounds to tell a story
Combining words and sounds to tell a story
In this activity you will learn to combine sound effects with an audio story telling
Objectives
- Combining words and sounds to tell a story
- Organizing recordings into files on folders
- Ability to create an audio communication
What prior skills are assumed
- Handling ICT equipment
- Managing files and folders
- Using multiple recording devices to record
What resources do you need
- Working computer lab with projector
- Computers installed with Ubuntu Operating System
- Speakers
- Recording devices and players
- Handout for Audacity
What digital skills will you learn
- Using multiple recording devices to record
- Combining audio for effective story telling
- Audio editing for combining audio to create effective stories, using Audacity
- Organizing recordings on folders
Description of activity with detailed steps
Teacher led activity
Your teacher will read a story of the Town Mouse and Country Mouse for you. Listen to it. She will then read the same story with some sounds added to it. Listen carefully and discuss what is the difference you observe between the two story telling activities. She does this with a tool called Audacity.
Are words more powerful? Are sounds more powerful? How does combining words and sounds create more effective stories?
Student activities
- You have already recorded many audio clips in the previous activity. Now add your narrations to the clips you have recorded. Combine the narration with the audio using Audacity.
- You have already created a narration of local history. Add sounds or music to the narration.
Portfolio
- Original audio clips and recordings
- Edited audacity projects and edited audio files
Audio visual communication level 2 learning check list
Check your learning
- Do I understand that audio can be a form of story telling?
- Am I able to use different devices to record audio and play back?
- Can I make my own effective audio story with sounds and words?
- Do I understand the importance of oral history?
Educational applications for learning your subjects level 2
In 'Educational software applications', at level 2, we will learn KGeography for understanding (political maps) mapping. We will continue our work with Geogebra for learning mathematics.
Activities
Your desktop atlas with KGeography
Using KGeography to learn political geography
In this activity, you will learn to use a political geography atlas software application. You will explore continents, countries, provinces in the maps provided by the tool.
Objectives
- Becoming familiar with digital maps of different political regions in the world, such as continents, countries, states.
- Becoming familiar with the continents of Europe and Africa using the maps. Exploring the political geography of these two continents and the countries in these two continents (Class VII Geography)
- Becoming familiar with the different land forms (peninsula, island etc)
What prior skills are assumed
- Handling ICT equipment
- Familiarity working with maps and text documents
What resources do you need
- Working computer lab with projector
- Computers installed with Ubuntu Operating System
- Handout for Ubuntu
- Handout for LibreOffice Writer
- Handout for KGeography
What digital skills will you learn
- Working with an interactive educational software application
- Creating images using screencast methods
Description of activity with detailed steps
Teacher led activity
- Your teacher will open the maps of Europe and Africa
- She will demonstrate how you can open the map of any continent, any country in the world in the KGeography software.
- She will demonstrate how the provinces of a country can also be seen in the maps
Student Activities
- Identify the countries in Europe and Africa. Can you identify similarities and differences between these two continents as you can find out from the two maps.
- Identifying states in India and the capital of each state. You can set this up as a quiz also.
- K Geography has a set of quiz questions, to test your knowledge of places. Select the ‘Place district in the map’ quiz. You should place the district map within the state map. You can do this for the undivided Andhra Pradesh state.
- You can try to play all the quizzes - locating the district in the map, identifying capital for each district, district for each capital etc.
- Use Screenshot to take photo of one country in Europe or Africa. Create a text document for that country, insert the image and type some interesting information about the country and its people, which you may have got from the text book, or your teachers or your friends or family. Try to write about the people, their culture, history, vegetation and any connections you can make among these aspects.
Portfolio
- Your photos of the countries and the text document (photo essay)
Learning maths with Geogebra 2
Objectives
- Understanding the working of an interactive environment like Geogebra
- Getting familiar with different features for creating and working with Geogebra sketches
- Exploring different mathematical concepts with Geogebra, thus experiencing mathematics
Digital skills
- Working in an interactive environment through the use of different functionalities
- Being able to visualize how to give inputs in a programmable environment
- Working with Geogebra to create sketches as well as play around with given sketches
Your learning outputs
- Geogebra files created by you
- Screenshots of sketches you have created using Geogebra
Activities
Learning about triangle properties
Getting introduced to triangle properties
In this activity, you will explore how angles are formed and the different kinds of angles
Objectives
- Using Geogebra to accurately construct and label geometric figures
- Visualizing how triangles are formed
- Understanding properties of triangles
What prior skills are assumed
- Basic familiarity with the Geogebra tool bar and the different features
- Working with text document and adding pictures
What resources do you need
- Working computer lab with projector
- Computers installed with Ubuntu Operating System
- Handout for Ubuntu
- Handout for Geogebra
- Geogebra files for demonstration
What digital skills will you learn
- Learning to work with interactive applications, with given input
- Creating, saving files with Geogebra
- Accurately drawing and measuring geometry figures
- Inserting pictures and completing the worksheet
Description of activity with detailed steps
Teacher led activity
We will continue the work you did with Geogebra last year to learn more mathematics. Your teacher will display the file below and ask you to explore how triangle can be constructed.
You will use the following Geogebra files which for this lesson. (You can click on the image to download the Geogebra file, you can do this for any Geogebra file in the text book)
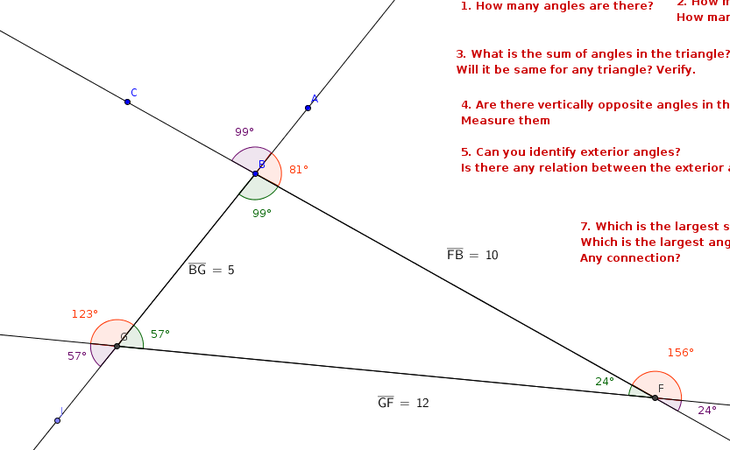
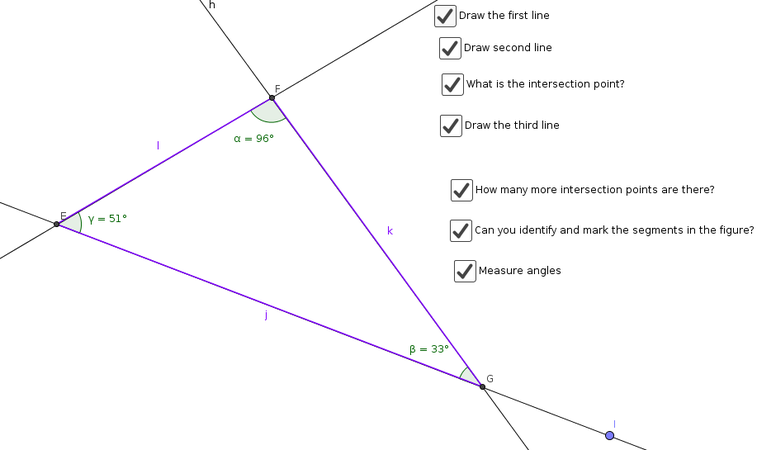
Your teacher will demonstrate the following to you:
- Drawing lines
- Plotting intersection points
- Identifying and measuring angles
- Marking a triangle
- Identifying vertically opposite angles
- Identifying exterior angles
- Verifying angle sum property
- Marking segments and measuring length
Student activities
Click here to download the worksheet. After the demonstration lesson, you will learn to construct the following:
- Three intersecting lines with the formation of a triangle
- Exploring the properties of a triangle and completing a worksheet
Portfolio
- Your completed Geogebra files will be the addition to your digital portfolio.
- Completed worksheet
Learning symmetry
Exploring symmetry with Geogebra
In this activity, you will explore lines of symmetry, reflection and rotation of objects.
Objectives
- Understanding rotation and reflection of geometric constructions
- Reflecting objects and drawing lines of symmetry
- Identifying lines of symmetry in given shapes visually
- Recognizing symmetric and non-symmetric objects
What prior skills are assumed
- Familiarity with the Geogebra application and tool bar
- Able to create different Geogebra sketches using the various functionalities - line, line segment, measurement of angles, measurement of segments, drawing polygons
What resources do you need
- Computer lab with projection equipment
- Handout for Ubuntu
- Handout for LibreOffice Writer
- Handout for Geogebra
- Geogebra files
- Handout for screenshot
What digital skills will you learn
- Creating Geogebra files to explore mathematical concepts
- Inserting screenshots of Geogebra sketches in a text document and summarizing the mathematics investigation
Description of activity with detailed steps
Teacher led activity
Part 1- Locating and drawing lines of symmetry
Look at the following pictures with your teacher. Identify how many lines of symmetry are there.
- Figures with symmetry


Your teacher will demonstrate the following:
- How to insert an image in Geogebra
- How to draw lines of symmetry to visually inspect symmetry?
Part 2 - Exploring ideas with symmetry with rotating and reflecting objects, in 2D and 3D
Your teacher will demonstrate the following to you in a Geogebra file:
- Drawing a line and rotating it
- Drawing a line segment and rotating it
- Creating reflections of objects
- Rotating polygons and creating new figures
See Geogebra handout for how to rotate objects. Your teacher may also introduce 3D visualization using Geogebra.
Student activities
Part 1 - Locating and drawing lines of symmetry
- You can insert the images discussed with your teacher and draw the lines of symmetry
- In the previous activity on Drawing with Geogebra, you had made several geometric sketches. Open those sketches and examine the axes of symmetry in those figures.
Part 2 - Exploring symmetry with reflection and rotation
- Draw polygon shapes and rotate and reflect the polygon along a line or along a point. Explore what shapes you can produce.
- Use the regular polygon tool and rotate around a point to see what shapes are produced.
Portfolio
- Your Geogebra sketches will be part of the portfolio.
Level 2 learning check list
Check your learning
Geogebra
- Do I know how to open Geogebra, create a sketch and save the file?
- Have I learnt about properties of triangles?
- Do I know how to format constructions, add text to my construction?
- Do I understand the difference between algebraic and geometric view?
- Do I understand symmetry in objects?
- Can I make geogebra sketches for rotating objects?
- Do I feel confident that I can use Geogebra to learn topics in mathematics for my learning?
KGeography
- Do I know how to open KGeography and browse maps of different countries and continents?
- Do I know to open the quizzes and answer quizzes?
What is the nature of ICT level 3
Objectives
- Understanding that the Internet is changing the way we live; and is becoming prominent in our society
- Appreciating that connecting is an important aspect of ICT and how peer learning is possible with ICT
- Understanding that internet is a place for self learning and exploring
- Understanding the safe and ethical use of internet
Digital skills
- Accessing the internet and browsing the web (understanding the difference between the two)
- Downloading information and organizing
- Identifying license information and using downloaded information appropriately
- Using safety tips while browsing
- Using emails to communicate
Your learning outputs
- You will develop a text document with a list of websites that you have accessed
- You will develop a concept map on what you intend to research on the internet
- Your concept map will lead to a text document with links to useful websites accessed along with a summary of the information on the site
- A short reflection on the role of technology and society and how students should interact with it - this can be in the form of a presentation or a text document with graphics
- Print (into to a file) copies of email conversations with your friends
Activities
- Activity 1 - Getting to know the internet
- Activity 2 - The global digital library
- Activity 3 - I have a new address
The machine is using us
Getting to know the internet
In this activity, you will be introduced to the internet, how it developed and how can we access the internet.
Check your readiness
- You must be familiar with different ICT terms
- You must be able to work with different applications - text editor, text processor, mind mapping tool, independently
- You must be able to access, open, create and save files in your folder
What resources do you need
- Computer lab with projection
- Access to Internet
- Pictures and videos
- Handout for Firefox
- Handout for LibreOffice Writer
- Handout for Freeplane
What digital skills do you need
- Understanding of the physical infrastructure needed to connect to the internet
- An understanding of what is the internet
- Browsing the web
- Using a search engine
Description of activity with detailed steps
Teacher led activity
- Your teacher will read with you the following section of the textbook on What is the internet. Discuss with your friends the different places you see where you think the internet is used. Make a list of things/ activities that you think needs the internet.
- Watch the video and browse.
|
|
Your teacher will show you this video in class.
Discuss with her the following: How is the text you write different from the text you type? How is the image you draw different when you do with digital art? We have seen earlier that you can use what is called the internet to access information not on your computer. How is this done? What is the internet and what is the web? What are the various kinds of information you can access on the internet? |
| Using a search engine, your teacher will open Wikipedia. She will explain how the search engine works and she will demonstrate different kinds of websites on the internet. |
Student activities
- Your teacher demonstrated different kinds of websites above. In groups, look for websites in the different categories. In each group search and make a list of 3-5 websites. Enter these addresses in a text document and add to your folder.
- Make a digital infographic of the internet and what it means for you. (Your teacher may also suggest to draw an infographic and digitize it)
Portfolio
- You should have a text document with a list of websites that you would have accessed
- Internet infographics - either hand drawn and digitized or created using a digital tool
The global digital library
The global digital library
In this activity, you will be introduced to methods of accessing, evaluating and organizing information from the internet.
Objectives
- Understanding that the internet is a network of computers
- Understanding that the world wide web is a global digital library
- Getting familiar with using the web for accessing, downloading and organizing resources
What prior skills are assumed
- You must be able to work with different applications - text editor, text processor, mind mapping tool, independently
- You must be able to access, open, create and save files in your folder
- You must have an understanding of the internet and be able to browse the web
What resources do you need
- Working computer lab with projector
- Computers installed with Ubuntu Operating System
- Access to the internet
- Handout for Firefox
What digital skills will you learn
- Accessing the internet, searching for information
- Downloading information
- Evaluating the information and creating a personal digital library for self learning
- Understand safe and ethical ways of using the internet
Description of activity with detailed steps
Teacher led activity
Demonstration 1
Your teacher will demonstrate for you how to access and organize information on the folder: follow along as she does the following
- Use a search engine to search for information - discuss with your teachers what happens when we do not give good key words
- Open the pages returned on each search
- She will demonstrate how to search for images, videos and text
- Download the resources accessed - the entire web page, image, videos, etc
- Your teacher will discuss with you how to legally download materials from the internet and how to use it correctly.
Demonstration 2
- Watch your teacher search for the following, "giraffe", "evolution of giraffe", "miraculous evolution of giraffe"
- Did you see any difference in the pages returned by the search?
- Does this tell you anything about how a search engine works? How can you search more effectively?
Student activities
This is an activity to be done in groups. If adequate internet access is there, individual activities may be done.
- Make a concept map for the topic or issue about which you want to research.
- In groups, access the internet and download information relevant to your topic.
- Organize your downloaded information into folders
- In a text document summarize what you have found on your topic. In your document, also give a ranking for your resources and give the reasons for your ranking; this analysis of resource accessed is called meta data of a resource.
Portfolio
- You would have developed a concept map for the topic that you want to research on.
- Your text document summarizing your internet research, which should contain links to web pages you have accessed
- Your resource folder which should contain your concept map, text document with a summary of resources, images downloaded and web pages saved on the computer.
I have a new address
I have a new address
In this activity, you will be introduced to sending and receiving emails through the internet.
Objectives
- Using an email to communicate with fellow students
- Understanding how to use email communication safely, including protecting passwords
What prior skills are assume
- You must be able to work with different applications - text editor, Concept mapping tool, independently
- You must be able to access, open, create and save files in your folder
- You must have an understanding of the internet and be able to browse the web
What resources do you need
What digital skills will you learn
- Logging into email (and log out)
- Creating a secure password, keeping it secure and changing passwords
- Sending an email to one person, sharing an attachment of a text document from your portfolio, with another person using email
- Sending an email to the class group
- Downloading attachment from an email, opening and studying it
- Configuring your 'signature' on your email
Description of activity with detailed steps
Teacher led activity
Demonstration 1
- Your teacher will explain to you how an email address can be your digital address. Your account is something you need to keep secure with your password and passwords are not to be shared with others. She will also show you how to use different privacy as well as inbox settings in your email account (we have used Gmail in this book).
- Your teacher will demonstrate for you how to send an email: follow along as she does the following
- Open the website where your mail server is (this will mostly be http://gmail.com)
- Login by providing your 'user id' and then 'your password'.
- Compose an email and send to another student whose id you know. You can send it to your team member
- Compose an email attaching a text resource you created in the previous activity (The global digital library). Briefly explain this resource in your mail and ask for your team member to give suggestions and feedback on your resource. Copy your teacher's email id (as the 'cc' id).
Demonstration 2
- Your teacher will demonstrate for you how to send an email: follow along as she does the following
- Receiving emails in your 'inbox'. You will get emails from your team members. Open and read them. Open the attachments also and read them
- 'Reply-to' the sender of the mail and give your comments on the resource shared by others
Demonstration 3
- Your teacher will demonstrate for you how to send an email to the 'class group', by putting the 'class group id' in the 'To' bar.
- This mail will go to all students. Reply to this mail with your comments and the reply will also go to all students in the class.
Student activities
Each student will work on sending and receiving email. If the number of students is more than the number of computers.
- Share the the topic on which you have done research by an email sent to the 'class group'. Ask the class students to give you feedback on your topic/resource.
- You will get feedback from your classmates on your topic. Please read the feedback and make changes to your text document if you feel the feedback is useful. Send a thank-you mail to those students, explaining why you found the feedback useful. Save the feedback documents in the same folder, add the name of the student who gave you the feedback to the file name itself before saving it, for easy identification later.
- You will also need to give feedback to your classmates on their resources. You can access resources on the topic, from the internet, to get ideas for your feedback also. In case you get useful web pages or images on the topic, which is not there in the resource emailed to you, you can share the webpage or web link with the student to include in her resource.
- You may be using a 'free' (as in free of cost) email such as Gmail. You should know that your mails can be 'read' by the email provider Google. Your mails are 'machine read' by Google to show you advertisements based on the content of your mails. Your mails may also be 'tapped' by authorised and unauthorised entities as it passes over the internet. Hence you need to take the maximum care of your digital information and be careful of what you share digitally.
Portfolio
- You would have many emails in your inbox, you can save an email which has useful comments in your folder
- Your text document with the modifications from the feedback given by your classmates
- Your resource folder which should contain your concept map, text document with a summary of resources, images downloaded and web pages saved on the computer.
Level 3 learning check list
Check your learning
- Am I aware that the internet is a place that I can access information from?
- Am I able to browse the internet and download useful and relevant information?
- Can I search the internet using search engines, and look for information (web pages, images, videos etc) that I want, on my topic of learning?
- Have I evaluated and organized the information meaningfully in folders?
- Do I know how to communicate using email?
- Am I aware of safety precautions I must take while using the internet?
- Do I understand how the internet is changing our world?
Data representation and processing level 3
Objectives
- Understanding that you can ask different questions with the given data
- Ability to read, collect, organize, analyse and present data using numbers, text and graphs
Digital skills
- Using spreadsheet for advanced data analysis – using (if,then) conditions, formulae for analysis, etc
- Working with a text editor to produce a multi page document with numbers, text and graphs
Your learning outputs
- Your data sets captured using spreadsheet
- Your data analyses with spreadsheet
- Your formatted text document
Activities
- Activity 1 - Spreadsheet for data analysis
- Activity 2 - Multi page text document
Spreadsheet for data analysis
Analyzing data with spreadsheets
In this activity, you will have large data sets on different items and you will learn methods of analyzing with spreadsheets.
Objectives
- Using a spreadsheet for data analysis
- Being able to identify how to group and view data
- Analyzing data and representing using charts and graphs; understanding what to analyze in a given data set
- Understanding the meaning of average, percentage difference, percentage share, growth rates, minimum and maximum and other such functionalities.
- Learning the use of different functionalities in spreadsheet for numerical analysis
What prior skills are assumed
- Familiarity with ICT environment
- Understanding of data organization
- Using spreadsheet for data inputs
- Making charts in spreadsheet
What resources do you need
- Working computer lab with projector
- Computers installed with Ubuntu Operating System
- Student generated data sets
- Secondary data sets
- Handout for LibreOffice Calc
- Handout for LibreOffice Writer
What digital skills will you learn
Description of activity with detailed steps
Teacher led activity
Analyzing data from tabulated data - Rainfall
Your teacher will help you analyze the data of rainfall in Telangana, using available data. Click here for the file. Look at the data and discuss with your teacher what are the various data measures that can be calculated. For example, some questions from this data can be the following:
- What is the maximum rainfall amount? Which year?
- What is the minimum rainfall amount? Which year?
- What is the average rainfall in the last ten years?
- Is there any pattern of rainfall?
- Are there other data that you can study along with this data to understand the weather and climate in Telangana? For example, what could be the connection between rainfall data and temperature, crop production or floods?
- Which is the best way to represent this data as a graph? Why?
- What are the additional data sets you would collect?
Analyzing data from tabulated data - Temperature
Your teacher already discussed the rainfall data with you. You may have wondered about temperature. In the attached file (above), along with Telangana rainfall, you also have details of annual and seasonal, maximum and minimum temperature in India. Look at the data and discuss with your teacher what are the various data measures that can be calculated. Your questions may be:
- What is the maximum temperature by season? Which year was it?
- Which year had the highest maximum temperature? Is there any connection between the two?
- By how much does the maximum temperature vary across seasons?
- What is the difference between maximum and mean temperature?
- Which is the best way to represent this data as a graph? Why?
- What additional data sets would you collect?
- Can you conclude anything from this data set?


Student activities
Your teacher would have made different data sets for your analysis. Look in your folder on your computer for these data sets. For each of the data sets, identify how you would like to group the data, what to analyze, what measures are important to calculate (average, percentage share, percentage change, minimum, maximum, etc), and also plot the graphs.
- From time to time, the Indian government conducts census, from time to time, to understand how the population is growing as well as to get some information on how the population is distributed. Would you not like to know about yourself? Check the file here for the census data.
- Some data on fruits and flowers and some horticulture products grown in India have been compiled across 10 years. Analyze the data for yourself to see how much more you can learn about flowers and fruits! Click here for the file.
- You are so familiar with the cellphone. Would you like to see how India's cell phone use compares with the world. Click here for the file.
- Another interesting data is on the number and types of vehicles on the road in India. See what kinds of analysis is possible with this data. Click here for the file.
Portfolio
- In your continuing portfolio, you should create your own spreadsheets with the analysis.
- Your portfolio should also include a text document with a written description of the analysis.
- Your concept map with highlights of your analysis for presentation.
Multi page text document
Making a multi page text document
In this activity, you will make a document which covers the various ideas you want to cover, comprehensively, for a topic. You will learn to use different features of a text editor to make this document clear and coherent.
Objectives
- Creating a rich text document, containing text, images, tables
- Formatting the text document, to arrange and highlight data
- Learning the use of different functionalities in text editor
What prior skills are assumed
- Familiarity with ICT environment
- Familiarity with the text editor LibreOffice Writer
- Understanding of data organization
- Familiarlty in using LibreOffice Calc to create spreadsheet for recording, analysing and presenting data
What resources do you need
- Working computer lab with projector
- Computers installed with Ubuntu Operating System
- Student generated data sets
- Secondary data sets
- Handout for LibreOffice Writer
What digital skills will you learn
- Preparing a rich text document
- Inserting images, tables and formatting
Description of activity with detailed steps
Teacher led activity
Creating a multi-page document
Your teacher will help you create a document, based on all the work you have already done. To make the document more useful to the reader, she will show you the following:
- Entering the information about the topic being worked on
- Entering the information tabulated earlier in a spreadsheet, in the form of a table in the document
- Adding section headings to the document whenever a new idea or sub-topic is being discussed
- Highlighting sections of the text, using features such as making the fonts bold or italicized. You can also change font size and colour
- Creating an automatic 'Table of Contents' for your document
Student activities
You should prepare a document for your topic. Practice creating sections in your document, to discuss different sub-topics. Run an automatic spelling check on your document, did you identify any spelling mistakes with this tool? Insert a 'Table of Contents' at the beginning of your document. Insert page numbers and name of your document in the footer of the document. Your document will now look like a professionally prepared output.
This 'digital writing' is quite different from writing in your notebook.You can move text across sections, create new sections, delete sections etc. You will notice that it is easy to make changes in the document created by another student, by adding sections, modifying text etc. Thus digital writing also makes it possible to create documents together.
You can also export your text document to the PDF format. The PDF format is not editable and can create a version of your work that is available for ever.
Portfolio
- In your continuing portfolio, you would include a text document, which will discuss your selected topic in detail, across sections (sub-topics).
Level 3 learning check list
Check your learning
- Am I able to organize my spreadsheet for data analysis?
- Have I learnt how to use conditions and formulas for analysis?
- Can I make a formatted text document with charts, data tables inserted?
- Can I organize my text document with page numbers and sections?
- Do I understand how to plan, organize and create a text document?
Communication with graphics level 3
Objectives
- Understanding how to communicate about processes and events
- Ability to build a story board and narrative
- Making different kinds of communication outputs
- Comic strips
- Posters
- Dialogues and story boards
- Developing a critical perspective on communication for building community
Digital Skills
- Combining text and images
- Creating digital images
- Using a Digital art creation tool
- Creating a formatted, communication piece
Your learning outputs
- Folder with images and pictures
- Document with picture stories (text and images)
- Digital art creations
- Posters, Brochures
Activities
- Activity 1 - Making a comic strip
- Activity 2 - Making posters
Making comic strips
Making comic strips
Objectives
- Expressing ideas and stories using a combination of images and text
- Creating dialogues and story boards
What prior skills are assumed
- Understanding the process of story telling and developing a story board
- Creating images using a digital tool like Tux Paint or digitizing hand drawn images
- Combining text and images in a text document, with use of tables
What resources do you need
- Stories for creating comic strips (from languages, science; e.g., what is the science behind "Rabbit and tortoise" story)
- Handout for Tux Paint
- Handout for Libre Office Writer
- Handout for Screenshot
- Templates for conversation bubbles
What digital skills will you learn
- Creating images and adding text using Tux Paint
- Combining the images with additional text in a text document
- Creating tables and inserting pictures in a text document
Description of activity with detailed steps
Teacher led activity
You must have seen Amar Chitra Katha. What if you could create your own Amar Chitra Katha for your Telugu or science stories? Would you not be interested? Your teacher will show you how to add images and text to create a comic strip. We will use some ready made images as below as well as conversation bubbles to create a comic strip for the story.
Your teacher will demonstrate the following:
- Adding images to the Tux Paint folder (you have done this earlier in the activity for creating animations).
- Adding text to the image
- Taking a screenshot and naming it correctly
- Inserting image in a text document
Student activities
- Your teacher will identify stories and concepts or events for you to create comic strips. She will also give you some ideas for social messages (like health, food wastage, vaccination) for which you can create comic strips.
- You should create comic strips of 3-5 images on the given idea
- In groups, create a novel as a comic story.
Portfolio
- Your folder of images created and edited using Tux Paint
- Your text document with the comic story
Making posters
Making posters
This is a cumulative project. You have learnt many tools for text, image and graphics creation. In this activity, you will combine all of these to create an output.
Objectives
- Ability to develop a graphics based communication, combining multiple tools
- Developing a critical perspective of social processes and events
What prior skills are assumed
- Familiarity with digital image creation and editing
- Familiarity with text processing
What resources do you need
No additional resources for this activity other than what used already
What digital skills will you learn
- Combining text and images
- Formatting and layout of a graphics communication in a text document
Description of activity with detailed steps
Teacher led activity
Your teacher will demonstrate a poster created as a single page with a text document. The poster could have the following:
- Text
- Numbers and graphs
- Photographs
- Hand drawn images
- Digital art creations
Student activities
Your teacher will identify topics/ ideas on which you will create posters. These can be done individually or in groups. A poster is a powerful way of communicating a message, which is why it is so widely used by political parties during elections, or by film producers to promote their films. You should create posters on important social issues, for e.g. campaign against harassment of women in public places, or a campaign to promote water conservation etc.
Portfolio
- Your posters in the form of text documents
- Background folder of images, graphs, photographs used for creating the poster
Level 3 learning check list
Check your learning
- Do I know how to create a comic strip?
- Do I understand the effectiveness of making a communication like that?
- Can I combine text, images, maps, tables and charts in a document to create a poster?
- Do I know how to format to make a neat graphics presentation?
Audio visual communication level 3
Objectives
- Understanding audio is a form of communication - both verbal and non-verbal
- Creating audio resources in the form of read-aloud books
- Creating illustrated books with audio narration
- Combining audio with sounds, text and images
- Understanding audio can be combined with words to communicate a message for sharing and for self learning and peer learning
Digital skills
- Audio recording using multiple devices - sounds (non verbal), narration
- Screencast recording to record illustrated stories being played
Your learning outputs
- You will create audio clips from the readings you do
- Video files will be created from the books you read aloud (with illustration)
Activities
- Activity 1 - Making an audio book
- Activity 2 - Making an audio visual book
Make an audio book
Making an audio book
In this activity you will learn to make an audio narration of a given text material.
Objectives
- Combining text and sounds (both verbal and non verbal) to create an audio book
- Ability to create an audio communication in the form of an audio book
What prior skills are assumed
- Handling ICT equipment
- Managing files and folders
- Creating digital text stories
- Using multiple recording devices to record
- Combining text and audio resources
What resources do you need
- Working computer lab with projector
- Computers installed with Ubuntu Operating System
- Speakers
- Recording devices and players
- Textual material to read
What digital skills will you learn
- Using multiple recording devices to record
- Organizing recordings on folders
Description of activity with detailed steps
Teacher led activity
Listen to the story being played below.
Discuss with your teacher how this recording could have been made and if you see any difference between the previous audio story telling activities and this. Your teacher will draw your attention to the audio file format for this recording. She will also draw your attention to how we pause, take a breath, when we record and also how to minimise external sounds when recording.
Student activities
- Your teacher will help you identify stories or articles to be read.
- These can even be from your own creations earlier in this course.
- You will read out the story or article and record it and copy to your folder on the computer
Portfolio
Your audio recording of your story or article.
Make a read aloud audio visual book
Making an audio visual book
This is a cumulative activity, as you near the end of the ICT course. You can take any of your outputs you have created - text document with analysis or animate stories - and make a read aloud of the text to create your multi media output!
Objectives
- Combining text and sounds (both verbal and non verbal) to create an audio book
- Ability to create audio narrations
- Combining audio and graphics communication to create audio visual communication
- Understanding how to use audio, images, text and how they complement each other in a communication
What prior skills are assumed
- Handling ICT equipment
- Managing files and folders
- Creating graphics and digital stories with images and text
- Using multiple recording devices to record
- Combining text and audio resources
What resources do you need
- Working computer lab with projector
- Computers installed with Ubuntu Operating System
- Speakers
- Recording devices and players
- Textual material to read
- Handout for Record my Desktop
What digital skills will you learn
- Organizing the resources needed for a multi media output - text, images, combined graphics of text and image
- Creating a screencast recording video
Description of activity with detailed steps
Teacher led activity
- Like we discussed earlier, this is a cumulative activity. Your teacher will demonstrate combining together audio with the previous formats of resources we created. You will be adding audio to materials you have created earlier. We will do this by using a method called screencast recording, using an application called Record my Desktop. Here we will record all the working of an application as it is playing on the screen. A text document, or an image slide show or a poster or an animation any resource can be recorded. To this we will add narration to make it an audio visual communication.
- Your teacher will take an example of any textual material created and capture the screencast recording while adding her narration. This will produce an audio visual communication.
- Your teacher will draw your attention to how we pause, how long we pause at a visual, how much narration to add for any visual, how to breathe while recording and also how to minimise external sounds when recording.
- She will also show you the file format and size of the video file and the difference between audio files and video files.
Student activities
You can make your audio visual communication on any of the following:
- Adding voice narration to a photo and image essay
- Reading aloud the illustrated songs and stories
- Adding a narration to the poster made
- Reading aloud the comic strip made
- The audio clips recorded in the first activity can also be combined, for making videos, if applicable.
Portfolio
- Your background folder of your materials used for the video
- Your first multi media production in the form of a video file!
Level 3 learning check list
Check your learning
- Do I understand that audio, image, text are all different forms of resources and that I can combine them?
- Do I know how to create an effective audio narration with good audio quality?
- Do I know how to make a screencast video?
- Do I understand how to use audio, images, text and how they complement each other in a communication?
Educational applications for learning your subjects level 3
In 'Educational software applications', at level 3, we will learn Marble for understanding more about physical geography. We will continue our work with Geogebra for learning mathematics. In level 3, you will also learn how to create animations with Geogebra. In this level, you will also be introduced to learn science with technology tools like simulations.
Activities
- Geography - Marble
- Mathematics - Geogebra
- Science - PhET
The globe on your table with Marble
Using Marble to learn physical geography
Marble is a digital atlas. It provides the physical geography of the Earth, while KGeography provides the political geography (with political borders dividing the continents into countries etc) of the Earth.
Objectives
- Understanding how the interactive environment of Marble, works as a digital atlas
- Playing with the features to explore and learn
Digital skills
- Navigating an educational software application
- Exploring a digital atlas (globe), drilling down and up locations on the map, identifying locations on the map
Your learning outputs
- Screenshots of maps you have worked on
Activities
- Playing with the globe
- Precipitation (rainfall), weather and climate
- Local weather and climate patterns
Playing with the globe
Objectives
- Exploring Earth as a 3-D model and explore different maps provided
What prior skills are assumed
- Opening different applications and creating folders and saving files
- Familiarity with using a key board
- Control in using a mouse or track pad

What resources do you need
- Working computer lab with projector
- Computers installed with Ubuntu Operating System
- Handout for Ubuntu
- Handout for Marble
- Handout for Screenshot
What digital skills will you learn
- Learning to work with interactive applications, with given input
- Creating picture essays on a topic
Description of activity with detailed steps
Teacher led activity
Your teacher will demonstrate Earth as a 3-D model and explore different maps provided. She will zoom into specific regions and move the earth in different directions, to give different views of the Earth.
Student activities
- You can open the "Atlas" map to see the different continents and oceans. You can rotate the Earth to see the entire globe. You can simulate the rotation of the earth by moving the Globe from left (west) to right (east). You can use the mouse to increase the zoom to see a place in more detail. You can move the Atlas to see India and increase the zoom to see the cities and towns in Telangana. Pick up any country of your choice. Try to move the Atlas to locate that region (though you will not see the country name, you can locate the cities and towns, rivers and mountains of that region).
- Chapter 2 of your class 6 text book is 'Globe - a model of the Earth'. Can you relate the activities in that chapter to the Marble globe? Identify the land masses and water masses. Are they equal? Are they equally distributed in the northern and southern hemispheres?
- You can make notes of your observations, analyses and conclusions. You can type these in a text document and insert the relevant images from Marble, captured through Screenshot.
Portfolio
- Your notes of your observations, analyses and conclusions, typed in a text document.
- Screenshots of the maps studied.
Precipitation, weather and climate
Objectives
- Exploring the rainfall maps provided in Marble and understanding patterns of rainfall in different regions
- Hypothesising causes for rainfall patterns in different parts of India and Earth
What prior skills are assumed
- Opening different applications and creating folders and saving files
- Familiarity with using a key board
- Control in using a mouse or track pad

What resources do you need
What digital skills will you learn
- Learning to work with interactive applications, with given input
Description of activity with detailed steps
Teacher led activity
- Your teacher will demonstrate the rainfall maps in Marble. She will show the rainfall patterns across the Earth in July and December months in different regions of the Earth and different regions in India.
Student activities
- You can see the 'Precipitation (July)' and Precipitation (December) maps. Is there any pattern in the rain heavy zones? Does it depend on the latitude?
- (tip - is there more rain in the northern hemisphere than southern hemisphere? Within the northern hemisphere, is it heavier in some parts, are these related to the latitude of that place?)
- Why is the rain heavy in the south west coastal part of India and less in the Deccan? Why is there a vertical strip adjacent to to the South West coastal area where there is very less rain?
- While North India around the Tropic of cancer has good rainfall, why is the same Tropic of Cancer region in Africa without any rain at all? Tip - This is the Sahara desert region. Is the lack of rain the effect of it being a desert or is it vice versa?)
- Record the summary of the discussions in a text document (this can be done as a group activity)
Portfolio
- Summary of the discussions in a text document
Local weather and climate patterns
Objectives
- Exploring the temperature maps and different temperature zones in Marble.
- Hypothesising possible causes for temperature patterns in different regions in the Earth
What prior skills are assumed
- Opening different applications and creating folders and saving files
- Familiarity with using a key board
- Control in using a mouse or track pad
.png)
What resources do you need
- Working computer lab with projector
- Computers installed with Ubuntu Operating System
- Handout for Ubuntu
- Handout for Marble
What digital skills will you learn
- Learning to work with interactive applications, with given input
Description of activity with detailed steps
Teacher led activity
Your teacher will demonstrate the temperature maps and different temperature zones in the Earth. She will discuss possible reasons for the temperature patterns in different regions. She will help you to search for articles from the internet relating to climate change (global warming)
Student activities
- You can see the 'Temperature (July)' and Temperature (December)' maps. In the June map, where is the weather hotter - northern or southern hemisphere? In the northern hemisphere, where is it the hottest? Why? Why is it hotter around the Tropic of Cancer in Africa and West Asia, compared to India?
- In the 'Temperature (December) map, where is the weather hotter - northern or southern hemisphere? Why is the southern hemisphere not as hot in December as the northern hemisphere is in July? In December, the northern hemisphere has larger areas which are colder, compared to Southern hemisphere during July. (or the range of temperatures in northern hemisphere is much more than the southern hemisphere). Why?
- Basically discuss what are the various factor that affect weather/climate - latitude, vegetation/forest area, coastal region v/s hinterland (distance from sea/water body), altitude, land mass vs water body etc). Discuss the weather and climate in your own location / region. What are the causes for the weather / climate patterns? Which countries are more vulnerable to the rising of ocean levels due to global warming?
- How has the weather been in Telangana and India during this year, what are possible causes of the same
- Can you type your answers to these questions in a text document. You can export images from Marble, using Screenshot and insert in the text document along with your explanations.
- Record the summary of the discussions in a text document (this can be done as a group activity)
Portfolio
- Your text document, with your inserted images and explanations
- Your folder of images created and a text document with the picture essay
Explore maths with Geogebra 3
ICT student textbook/Explore maths with Geogebra 3
Learning about quadrilateral properties
Getting introduced to quadrilateral properties
In this activity, you will explore how different quadrilateral shapes are formed
Objectives
- Using Geogebra to accurately construct and label geometric figures
- Visualizing how quadrilaterals are formed
- Understanding properties of quadrilaterals
What prior skills are assumed
- High level of familiarity with the Geogebra tool bar and the different features
- Working with text document and adding pictures
What resources do you need
- Working computer lab with projector
- Computers installed with Ubuntu Operating System
- Handout for Ubuntu
- Handout for Geogebra
- Handout for Screenshot
- Geogebra files for demonstration
What digital skills will you learn
- Learning to work with interactive applications, with given input
- Creating, saving files with Geogebra
- Accurately drawing and measuring geometry figures
- Inserting pictures and completing the worksheet
Description of activity with detailed steps
Teacher led activity
We will continue the work you did with Geogebra last year to learn more mathematics. Your teacher will display the file below and ask you to explore how quarilaterals can be constructed.
You will use the following Geogebra file for this lesson. (You can click on the image to download the Geogebra file, you can do this for any Geogebra file in the text book)
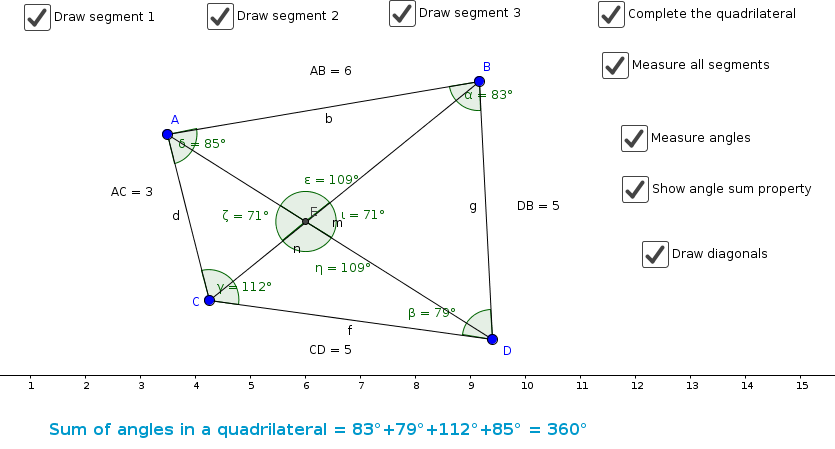
Your teacher will demonstrate the following to you:
- Drawing segments after plotting points
- Measuring and labeling segments
- Identifying and measuring angles
- Using the rounding off option
- Marking a quadrilateral
- Verifying angle sum property
- Making a textbox with a conclusion
- Demonstrating the use of an input box like a check box
Student activities
Click here to download the Quadrilateral worksheet and here to download the triangle worksheet. After the demonstration lesson, you will learn to construct the following:
- Four intersecting lines with the formation of a quadrilateral - try it with all equal sides, two sides equal, etc. Did you notice any difficulty in construction?
- Exploring the properties of a quadrilateral and completing a worksheet
Portfolio
- Your completed Geogebra files will be the addition to your digital portfolio.
- Completed worksheet
How to make Geogebra dynamic?
Using slider to build animation
In this activity, you will learn how to use slider to vary parameters in a geometric construction
Objectives
- Using Geogebra to make sketches for exploring concepts in geometry
- Understanding how to vary parameters to explore concepts in geometry
- Building animations with slider
What prior skills are assumed
- High level of familiarity with the Geogebra tool bar and the different features, including check box and text box
- Working with text document and adding pictures
What resources do you need
- Working computer lab with projector
- Computers installed with Ubuntu Operating System
- Handout for Ubuntu
- Handout for Geogebra
- Handout for Screenshot
- Geogebra files for demonstration
What digital skills will you learn
- Learning to work with interactive applications, with given input
- Accurately drawing and measuring geometry figures
- Creating animations with changing parameters using the slider function in Geogebra
Description of activity with detailed steps
Teacher led activity
In the last activity, you would have tried to create quadrilaterals with two equal sides, all sides equal etc. You may have found that it is difficult to only visually draw of a given length. In addition, once you have changed the side, you cannot go back to the earlier construction.
In Geogebra, you have a tool called slider which you can use to vary the value of a parameter and by varying it you can study the properties of the figure being constructed.
You will use the following Geogebra files which for this lesson. (You can click on the image to download the Geogebra file, you can do this for any Geogebra file in the text book)
- Angle demonstration with slider
- Side demonstration with slider
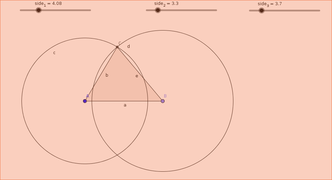
Your teacher will demonstrate the following to you:
- Demonstrating how to add a slider
- Angle
- Side
- How to change an object using the mouse/keyboard to change the slider
- Making a textbox with a conclusion
Student activities
After the demonstration lesson, you will learn to construct the following:
- Angle of given side
- Triangle with given sides
- Quadrilateral with given sides
Portfolio
- Your completed Geogebra files will be the addition to your digital portfolio.
- Your screenshots of sliders and associated geogebra sketches
Learning science with different technology tools
Using simulations to learn science
In this activity, you will get introduced to using simulations to explore a topic in science, as a virtual experiment.
Objectives
- Understanding the importance of experimentation in science
- Developing an understanding of simulations and how they work
- Developing a communication based on a simulation completion
What prior skills are assumed
- Familiarity with the ICT environment
- Ability to work with multiple applications
- Being able to create text documents, concept maps and graphics communication
What resources do you need
- Working computer lab with projector
- Computers installed with Ubuntu Operating System
- Access to internet
- Handout for Ubuntu
- Handout for PhET
What digital skills will you learn
- Working with interactive environments like simulations
- Taking screenshots of simulation applications
- Creating an experiment log with simulation details, observations and conclusions
Description of activity with detailed steps
Teacher led activity
Watch the following three resources that your teacher will demonstrate in the class. Discuss, in small groups, and share with your teacher what is the difference between each of the three resources.
|

|
|
In particular, discuss with your teacher and the class how simulations are different.
Your teacher will demonstrate the following to you:
- Opening a simulation (Force)
- Changing the parameters
- Taking screenshots of the virtual experiment at different points and with different parameters
- Analyse what is happening and record your understanding
- Create a text document with screenshots of the simulation and discussion of the experiment
Student activities
- Your teacher will give you the following simulations
- Color vision
- Friction
- Sound
- In groups, you can work with the simulations and also answer the questions given.
- You will create a text document which contains a description of the experiment as you have simulated it
Portfolio
- Your text document with the description of the virtual experiment you have done
- Your folder with screenshot images of the simulations you have run
Level 3 learning check list
Check your learning
Marble
- Do I know how to navigate a digital atlas like Marble, to study physical geography of the Earth?
- Can I open different maps available in Marble and study the information they communicate on different topics?
Geogebra
- Do I know how to create Geogebra sketches for any given problem?
- Am I feeling confident about using Geogebra for exploring and self learning different concepts in geometry?
- Do I know how to use slider to make an animation?
PhET
- Do I understand the difference between simulation, animation and a video?
- If I am given a simulation do I feel confident that I can change parameters and use it for exploring and self learning?
- Will I be able to take screenshots of simulations and insert into a text document and create my own explanation of a scientific concept?
Concluding remarks
In summary
We hope you have found this journey with technology enjoyable. As you would have experienced, this is an area of knowledge, where rapid changes are taking place. Not only are ICT changing how we are learning, they are also defining what is to be learnt. Occupations and vocations are no longer limited to the traditional ones of teaching, engineering or medicine. ICT also have an enormous potential for allowing greater access and opportunities for more people to express and create knowledge, in multiple ways. When the possibilities for knowledge creation change, more knowledge will be produced from areas which would have earlier been left unexplored. However, for this vision to be realised, we need to approach ICT as if it is a public resource - of all, by all and for all. The power of ICT must be guided by the spirit of participation and democracy.
We will explore more areas of technology learning in Book 2 of this subject, in classes 9 and 10.
We hope you have enjoyed this journey and do share your feedback below.
Feedback
Feedback is very important in many topics, especially when writing a book like this. We would like to learn from your experience using this book.
- How did the book help you in technology learning?
- How did the book help you in subject learning?
- What did you like the most about the book? Why?
- What did you like the least about the book? Why?
- Which topics did you have problem understanding?
- Wish three things that should be included in the book!
Additional readings
Notes for the students
This chapter is meant for you to read, with your friends and teachers, to develop an understanding of technology in society. Your teacher will introduce some of these readings, as part of activities. Do not worry if some of these terms are new - as you complete the ICT course, you will understand more; please keep this chapter as a ready reference and come back to read it.
Science, Technology and Society
ICT student textbook/Science, Technology and Society
Ethics of technology
You will be learning to use ICT for many purposes. However, you should know that ICT use can be beneficial or harmful, and you need to use your judgement in the use of ICTs. Ethical challenges in the use of ICTs can arise in the following situations:
- Plagiarism - showing resources created by others as created by oneself
- Using others resources without their permission, or as per the 'license' associated with the resource.
- Participating in a virtual forum in an offensive manner, violating the etiquette of virtual forum behaviours
You need to be aware of these dangers and learn to avoid these, and help your classmates also avoid these.
Plagiarising - passing off resources created by others as created by oneself
It is easy to copy a resource from the internet and include in your own work without giving credit to the creator. This is called 'plagiarism', the more familiar word is 'copying'. This is an unethical practice. Nowadays, there are software applications which can check a digital submission to check if it includes (plagiarises) other resources in an unethical manner. Referring to other resources, 'citing' them in your work, or adapting them to meet the needs of your work are ethical activities. This is called 'fair use' of materials created by another person. However, if you copy large parts of another resource not created by you, in your own work, with or without acknowledgement, it may be seen as plagiarism. What is 'minor' copying or 'large' depends on the situation, and you need to use your judgement. In case of doubt, always discuss with your teachers, classmates and friends. One simple rule - use materials from existing OER sources, and give credit to the source, in your own document.
Using others resources violating the 'license' associated with the resource
Digital resources, including software and content always have an associated 'license' of use. In case the software or content is licensed as 'proprietary', where the creator has all the rights, and has not given any rights to others, then using the digital resource is illegal, without paying the required license fee, as well as unethical. Such use is called 'piracy'. You may find it technically very easy to just 'copy-paste' an article from the Internet or copy a proprietary software program from another computer, or download a movie from the internet which is not licensed to be copied. All these would be unethical practices and must be avoided. For the same reason, your school computer lab must not have any pirated software. If you find any pirated software or content in the school computers, please do bring it to the notice of your teacher.
Free and Open Source Software and Open Educational Resources
One way of avoiding this unethical practice, is to use and promote Free and Open Source Software (FOSS) and Open Educational Resources (OER). FOSS and OER movements aim at providing digital resources that are licensed to allow you to make copies. In addition, you can modify the software / content resource and share again. It is ethical to use FOSS and OER. It is unethical to pirate proprietary software or content.
Remember that if a digital resource has no explicit copyright clause mentioned, it means it is owned by the creator with no rights for others. Hence when you create a digital resource, please take care to explicitly mention that it is an OER. You can do this by providing the copyright clause such as - "Copyright - Creative Commons CC BY SA 4.0", you can mention this in the first page itself, below the title of the article.
Ethical use of internet
The Computer Professionals for Social Responsibility has prepared the 'ten commandments' or ten rules for use of computers, some of which are listed below:
- You should not use a computer to harm other people.
- You should not interfere with other people's computer work.
- You should not snoop around in other people's computer files.
- You should not use a computer to steal.
- You should not copy or use proprietary software for which you have not paid
- You should not use other people's computer resources without authorization
- You should always use a computer in ways that ensure consideration and respect for others
This can be pasted on your computer lab as 'Do's and Dont's of using the lab.
Internet Safety
The virtual world also can be as or more dangerous than the real world. Cyber bullying (including by students of other students), abusive communication, on-line fraud including transfer of funds from your bank accounts etc are common.
Read these news articles and discuss among your friends. Think of the steps you should take to avoid getting into trouble.
- 'Ditched' by Facebook lover, 14-year-old girl hangs self, news article shows that the use of Facebook by children which is not supervised by parents/teachers can be quite dangerous.
- A 20-year-old girl student was arrested by the Cyber Crime Police on Thursday on the charge of creating a fake Facebook id in the name of another girl and posting her photographs, phone numbers and some abusive messages and causing mental agony to her, from The Hindu
- Hyderabad student stalked girls through Facebook. This article shows how dangerous it can be to befriend strangers. As a simple but necessary rule, never make any friend on-line, unless you already are their friend off-line
- Using social networking sites presents children and their friends and families with safety, security, and privacy risks. read the article from Truthout
- Mobile Internet abetting cyber crimes, say police, Hindu September 2014
- Phishing: 3 victims lose Rs. 20 lakh, Hindu September 2014. (Banking fraud)
- Internet - a double-edged sword. Hindu April 4, 2015
- A June 2011 Consumer Reports "State of the Net" survey "unearthed several disturbing findings about children and Facebook": One million children were harassed, threatened, or subjected to other forms of cyber bullying during 2010.
- Of the 20 million minors who actively used Facebook in the past year, 7.5 million - or more than one-third - were younger than 13 and not supposed to be able to use the site.
- Among young users, more than 5 million were 10 and under, and their accounts were largely unsupervised by their parents.
Apart from harm that may be inflicted by others through the internet, there is harm from excessive use of the internet. See Man treated for Internet addiction. South Korea, the country which has the highest density of internet use has internet deaddiction centres in more than 100 hospitals.
Like any other resource, the internet needs to be used wisely, there is a danger of misuse, abuse and over-use. Please visit the following sites to learn about safe internet use
- https://www.getsafeonline.org/protecting-your-computer/safe-internet-use/
- http://blog.searchlock.com/internet-safety-tips-kids-teens/
Apart from harm to yourself, the use of the internet can cause problems for your computer, through malware (software viruses), or spam (unwanted mails). Do not download any software or content to your computer from the internet, unless you have clear instruction from your teacher.