Difference between revisions of "Learn Thunderbird"
| Line 24: | Line 24: | ||
==Functionalities== | ==Functionalities== | ||
| − | |||
| − | |||
{| class="wikitable" | {| class="wikitable" | ||
|- | |- | ||
| − | |style="width: 50%;| | + | |style="width: 50%;|{{ext-img|550px|https://upload.wikimedia.org/wikipedia/commons/e/ea/Thunderbird_1_Configuring_gmail_for_enabling_download_to_thunderbird.png}} |
| − | |style="width: 50%;| | + | |style="width: 50%;|{{ext-img|550px|https://upload.wikimedia.org/wikipedia/commons/8/81/Thunderbird_2_Configuring_Thunderbird_on_your_computer_1st_step.png}} |
| + | |style="width: 50%;|{{ext-img|550px|https://upload.wikimedia.org/wikipedia/commons/0/03/Thunderbird_3_Configuring_Thunderbird_on_your_computer_2nd_step.png}} | ||
| + | |style="width: 50%;|{{ext-img|550px|https://upload.wikimedia.org/wikipedia/commons/1/14/Thunderbird_4_Configuring_Thunderbird_on_your_computer_3rd_step.png}} | ||
| + | |style="width: 50%;|{{ext-img|550px|https://upload.wikimedia.org/wikipedia/commons/2/29/Thunderbird_5_Configuring_Thunderbird_on_your_computer_4th_step.png}} | ||
| + | |style="width: 50%;|{{ext-img|550px|https://upload.wikimedia.org/wikipedia/commons/9/9c/Thunderbird_6_Seeing_receiving_and_sending_email.png}} | ||
| + | |style="width: 50%;|{{ext-img|550px|https://upload.wikimedia.org/wikipedia/commons/a/a5/Thunderbird_7_creating_folders.png}} | ||
| + | |style="width: 50%;|{{ext-img|550px|https://upload.wikimedia.org/wikipedia/commons/2/2b/Thunderbird_8_tagging_emails_as_reminders.png}} | ||
| + | |style="width: 50%;|{{ext-img|550px|https://upload.wikimedia.org/wikipedia/commons/2/23/Thunderbird_9_saving_mail_as_draft.png}} | ||
| + | |style="width: 50%;|{{ext-img|550px|https://upload.wikimedia.org/wikipedia/commons/d/d9/Thunderbird_10_Sending_mail_when_offline.png}} | ||
| + | |style="width: 50%;|{{ext-img|550px|https://upload.wikimedia.org/wikipedia/commons/f/fa/Thunderbird_11_message_filters.png}} | ||
| + | |style="width: 50%;|{{ext-img|550px|https://upload.wikimedia.org/wikipedia/commons/2/29/Thunderbird_12_search_mails.png}} | ||
| + | |||
|- | |- | ||
| − | |style="width: 50%;| | + | |
| − | |style="width: 50%;| | + | |
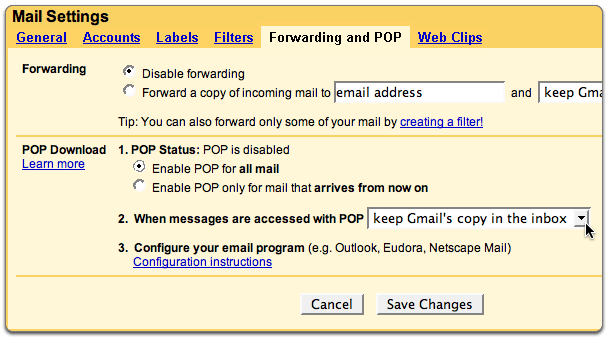
| − | |- | + | |style="width: 50%;|Step 1- Step 2 - Configuring your gmail to allow mail download to your computer / mail client |
| − | |style="width: 50%;| | + | You can read your Gmail messages from a client or device that supports POP, like Microsoft Outlook or Mozilla Thunderbird. |
| − | |style="width: 50%;| | + | To enable POP in Gmail: |
| − | |- | + | Sign in to Gmail. |
| − | |style="width: 50%;| | + | Click the gear icon in the upper-right and select Mail settings at the top of any Gmail page. |
| − | |style="width: 50%;| | + | Click Forwarding and POP/IMAP. |
| + | Select Enable POP for all mail or Enable POP for mail that arrives from now on. | ||
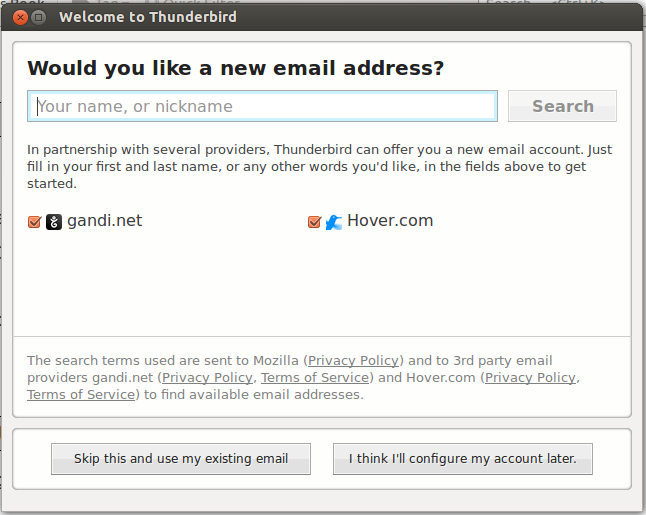
| + | |style="width: 50%;|Step 2- Configuring your Thunderbird mail client – incoming server | ||
| + | To add a new mail account in Thunderbird, follow the steps: | ||
| + | When you open Thunderbird for the first time you need to create a mail account (your existing e-mail account). | ||
| + | Go to File → New → Mail Account. | ||
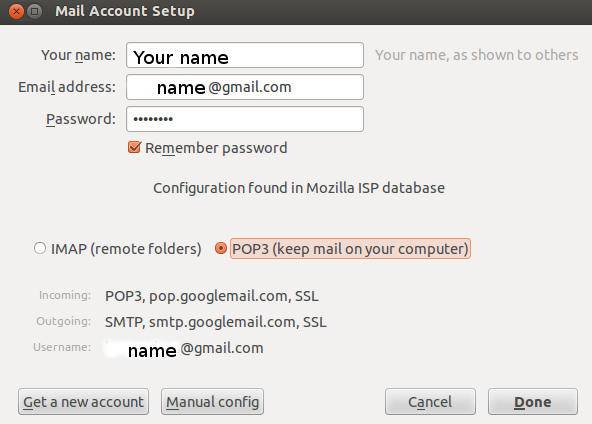
| + | |style="width: 50%;|Step 3-Configuring your Thunderbird mail client – step 2 providing the email account / id and password | ||
| + | |style="width: 50%;|Step 4-Configuring your Thunderbird mail client – step 3, setting up the incoming server settings. | ||
| + | |style="width: 50%;|Step 5-Configuring your Thunderbird mail client – this is the screen | ||
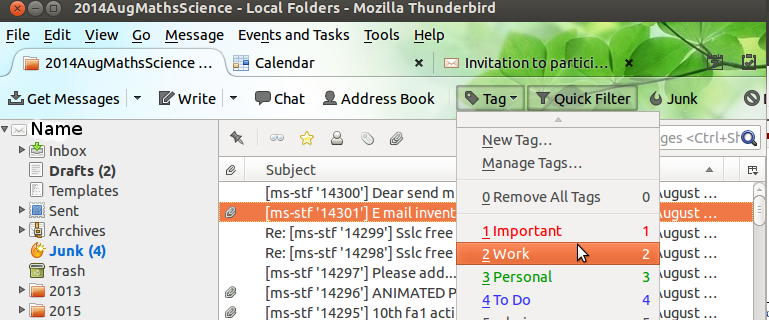
| + | |style="width: 50%;|Step 6-On opening Thunderbird, you will see the ‘mail folders’ on the left side. Selecting any folder will display the mails in the folder. | ||
| + | Click on Get messages (for receiving), and Write (for replying) | ||
| + | |style="width: 50%;|Step 7-Categorizing mails by storing in folders and sub folders. Right click on any folder to create a ‘sub-folder’ to that folder. | ||
| + | |style="width: 50%;|Step 8-Tagging mails for setting reminders | ||
| + | |style="width: 50%;|Step 9-Storing a mail drafts folder if still not completed. | ||
| + | (A mail can be saved before sending in the ‘Drafts’ folder) | ||
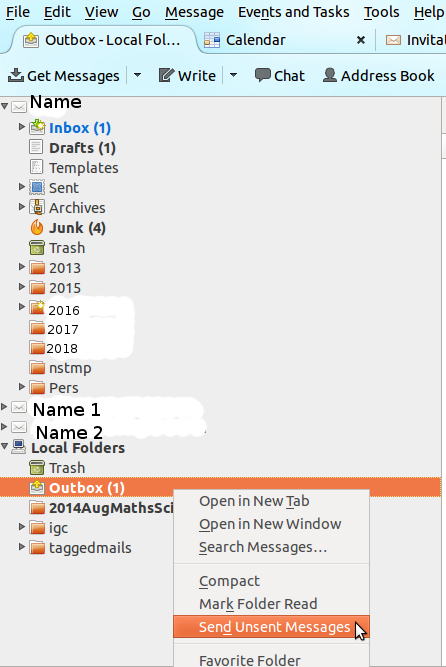
| + | |style="width: 50%;|Step 10-Sending a mail to ‘Outbox’ folder, when off-line, to send later when connected to Internet (A mail once ready to be sent, can be saved in the ‘Outbox’ folder by typing CTRL-SHIFT-ENTER at same time, this will save the message in the Outbox folder. This is useful to do, if you do not have connectivity at that time. Later, when you get connected to the Internet, you can right click on the Outbox folder to ‘send unsent messages’. | ||
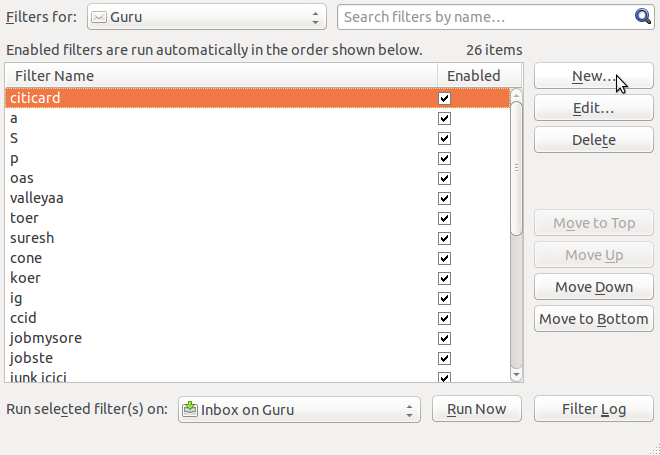
| + | |style="width: 50%;|Step 11-You can create a ‘mail filter’ by clicking on Tools → Message Filters – New. You can move any mail satisfying your condition (a particular sender email id) to a specified folder etc. This feature can be used to move ‘group’ or mailing list emails to a separate folder, without flooding your inbox | ||
| + | Filters can be setup by person, by subject line, by list | ||
| + | Filters are executed in the order displayed. In case of multiple filters, you can set priority for running the filters. | ||
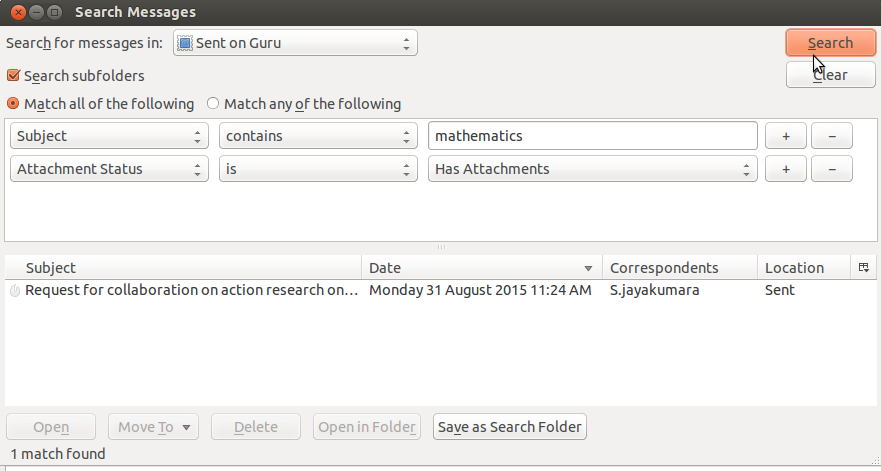
| + | |style="width: 50%;|Step 12-One of the powerful uses of a mail client is to be able to search for any mail (or set of mails) by providing parameters. For instance, if you want a resource shared by a particular teacher few months ago, you can search for mails in the relevant folder, by giving the sender id and specifying that the mail had attachments. The retrieved results will be shown in a window and mails in this list can be opened. The parameters for search include - | ||
| + | Sender id, Receiver id, With / without attachments, Size of file, Age of mail etc | ||
| + | You can also have combinations of parameters using both “AND” and “OR” claus. | ||
| + | |||
|} | |} | ||
Revision as of 09:11, 14 October 2016

Introduction
ICT Competency
Connecting and learning
Educational application and relevance
Thunderbird is an email client. It will help teachers and students to share information and resources with one another. The emails in thunderbird are like a library, since emails (and resources) can be categorized and stored and searched and retrieved later.
Version
Thunderbird Version 45.2.0 on Ubuntu GNU/Linux
Configuration
Thunderbird needs to be configured on your computer, by providing the email account, incoming and outgoing server information to your computer. Any paid email provider will give you this information. Free (mufta) email provider such as gmail also provides this information. In our illustration below, we will take gmail (from google) for configuring on Thunderbird on your computer.
Configuration of Thunderbird on your computer can be done in two parts. 1. Configuring your gmail to allow mail download to your computer / mail client 2. Configuring your Thunderbird mail client, this consists of four steps
Overview of Features
Thunderbird is an email client, which does the usual functions of mailing – receiving, sending and storing emails. Mails can be stored in folders and sub folders to categorize mails based on subjects or senders or time periods or a combination of these. Files can be attached and shared with others. Emails can be searched easily by providing information on different elements such as sender, receiver, date etc. Mail ids can be connected to form ‘mailing-lists’ (such as google groups), by which, mail sent to the list id will be sent to all members of the group, this is ideal to create ‘professional learning communities’ of teachers with a common interest or need.
Other similar applications
Other free email clients include Evolution, Kmail, Claws mail etc. Microsoft Outlook is a proprietary email client, so is gmail.
Development and community help
Working with the application
Functionalities
|
|

|
|

|

|

|
|

|
|
|
|
| Step 1- Step 2 - Configuring your gmail to allow mail download to your computer / mail client
You can read your Gmail messages from a client or device that supports POP, like Microsoft Outlook or Mozilla Thunderbird. To enable POP in Gmail: Sign in to Gmail. Click the gear icon in the upper-right and select Mail settings at the top of any Gmail page. Click Forwarding and POP/IMAP. Select Enable POP for all mail or Enable POP for mail that arrives from now on. |
Step 2- Configuring your Thunderbird mail client – incoming server
To add a new mail account in Thunderbird, follow the steps: When you open Thunderbird for the first time you need to create a mail account (your existing e-mail account). Go to File → New → Mail Account. |
Step 3-Configuring your Thunderbird mail client – step 2 providing the email account / id and password | Step 4-Configuring your Thunderbird mail client – step 3, setting up the incoming server settings. | Step 5-Configuring your Thunderbird mail client – this is the screen | Step 6-On opening Thunderbird, you will see the ‘mail folders’ on the left side. Selecting any folder will display the mails in the folder.
Click on Get messages (for receiving), and Write (for replying) |
Step 7-Categorizing mails by storing in folders and sub folders. Right click on any folder to create a ‘sub-folder’ to that folder. | Step 8-Tagging mails for setting reminders | Step 9-Storing a mail drafts folder if still not completed.
(A mail can be saved before sending in the ‘Drafts’ folder) |
Step 10-Sending a mail to ‘Outbox’ folder, when off-line, to send later when connected to Internet (A mail once ready to be sent, can be saved in the ‘Outbox’ folder by typing CTRL-SHIFT-ENTER at same time, this will save the message in the Outbox folder. This is useful to do, if you do not have connectivity at that time. Later, when you get connected to the Internet, you can right click on the Outbox folder to ‘send unsent messages’. | Step 11-You can create a ‘mail filter’ by clicking on Tools → Message Filters – New. You can move any mail satisfying your condition (a particular sender email id) to a specified folder etc. This feature can be used to move ‘group’ or mailing list emails to a separate folder, without flooding your inbox
Filters can be setup by person, by subject line, by list Filters are executed in the order displayed. In case of multiple filters, you can set priority for running the filters. |
Step 12-One of the powerful uses of a mail client is to be able to search for any mail (or set of mails) by providing parameters. For instance, if you want a resource shared by a particular teacher few months ago, you can search for mails in the relevant folder, by giving the sender id and specifying that the mail had attachments. The retrieved results will be shown in a window and mails in this list can be opened. The parameters for search include -
Sender id, Receiver id, With / without attachments, Size of file, Age of mail etc You can also have combinations of parameters using both “AND” and “OR” claus. |
File formats for creation
Saving the file
Export and publishing files
Advanced features
Installation
| Method of installation | Steps |
|---|---|
| From Ubuntu software Centre | Steps |
| From Terminal | Steps |
| From the web | Steps |
| Web based registration | Steps |
The application on mobiles and tablets
Ideas for resource creation
References
How to use template
{{subst:Explore_an_application}} on the page you create for your tool. Page Name should be "Learn ToolName"